Jean-Paul: pattern alterations

Readytosew's patterns are drafted for a B cup and an average hight of 165cm so if you differ from that, you might need to do some pattern adjustments. For a boilersuit pattern, I highly recommend making a toile first. You will be then working from this first toile to adjust the coverall where needed. On this tutorial, we will go throught the process of lengthening and shortening the Jean-paul coverall pattern and blending between sizes. If you need to do some bust adjustments, you can follow this tutorial. Lets start with the shortening/lengthening adjustment first.
![]()
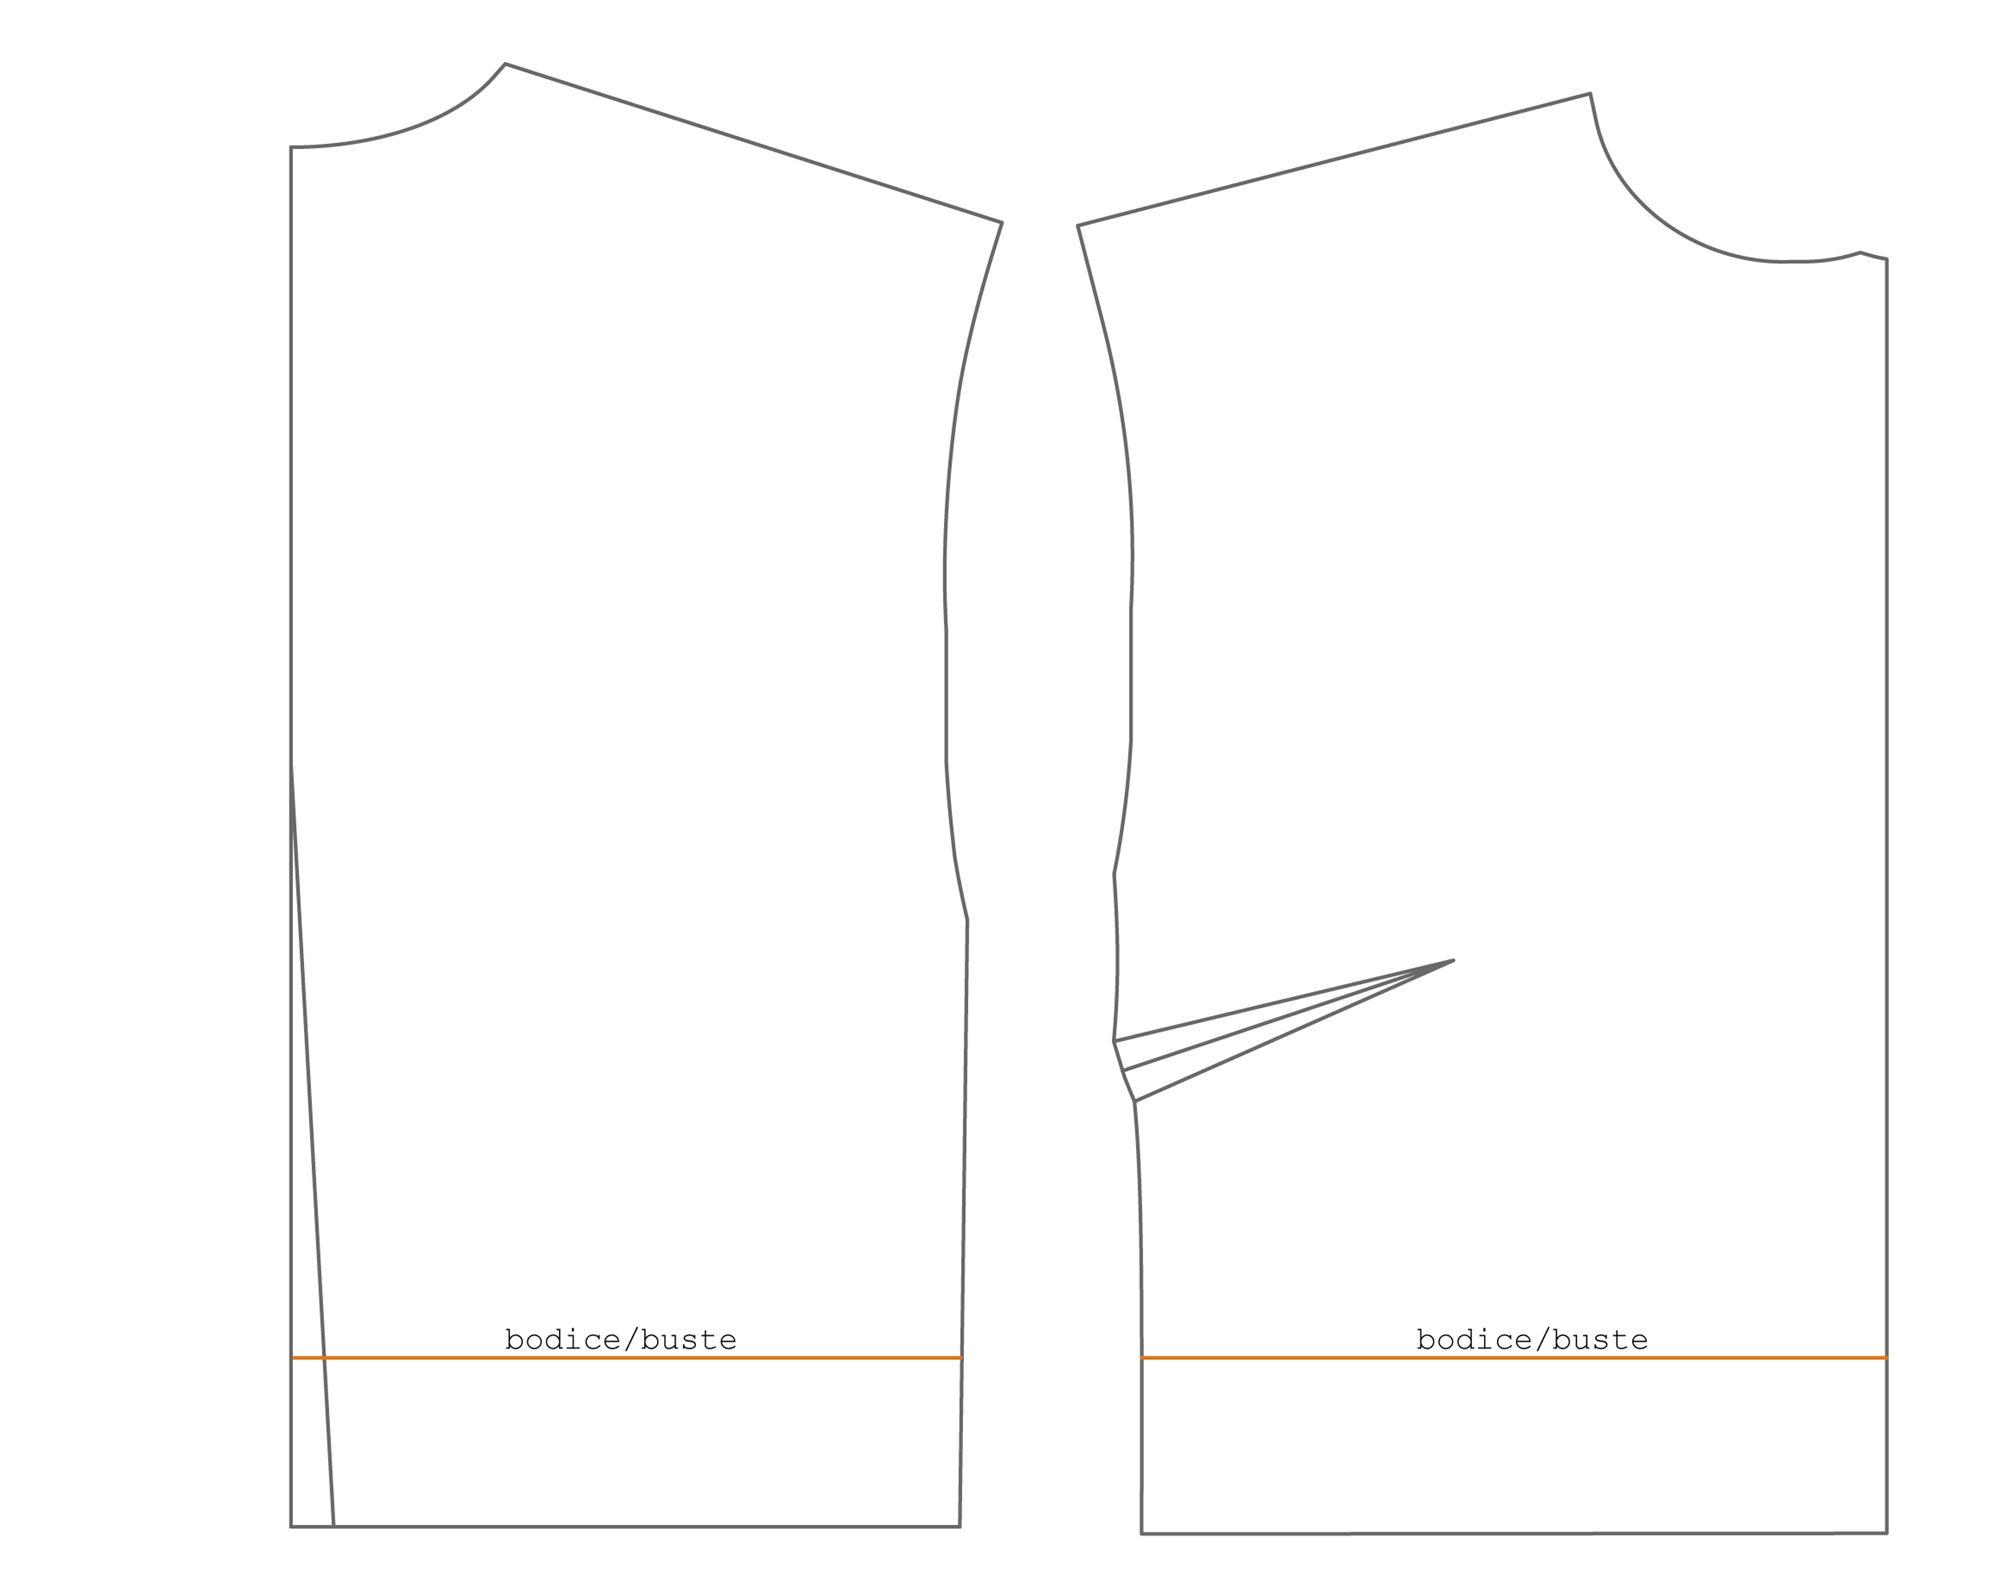
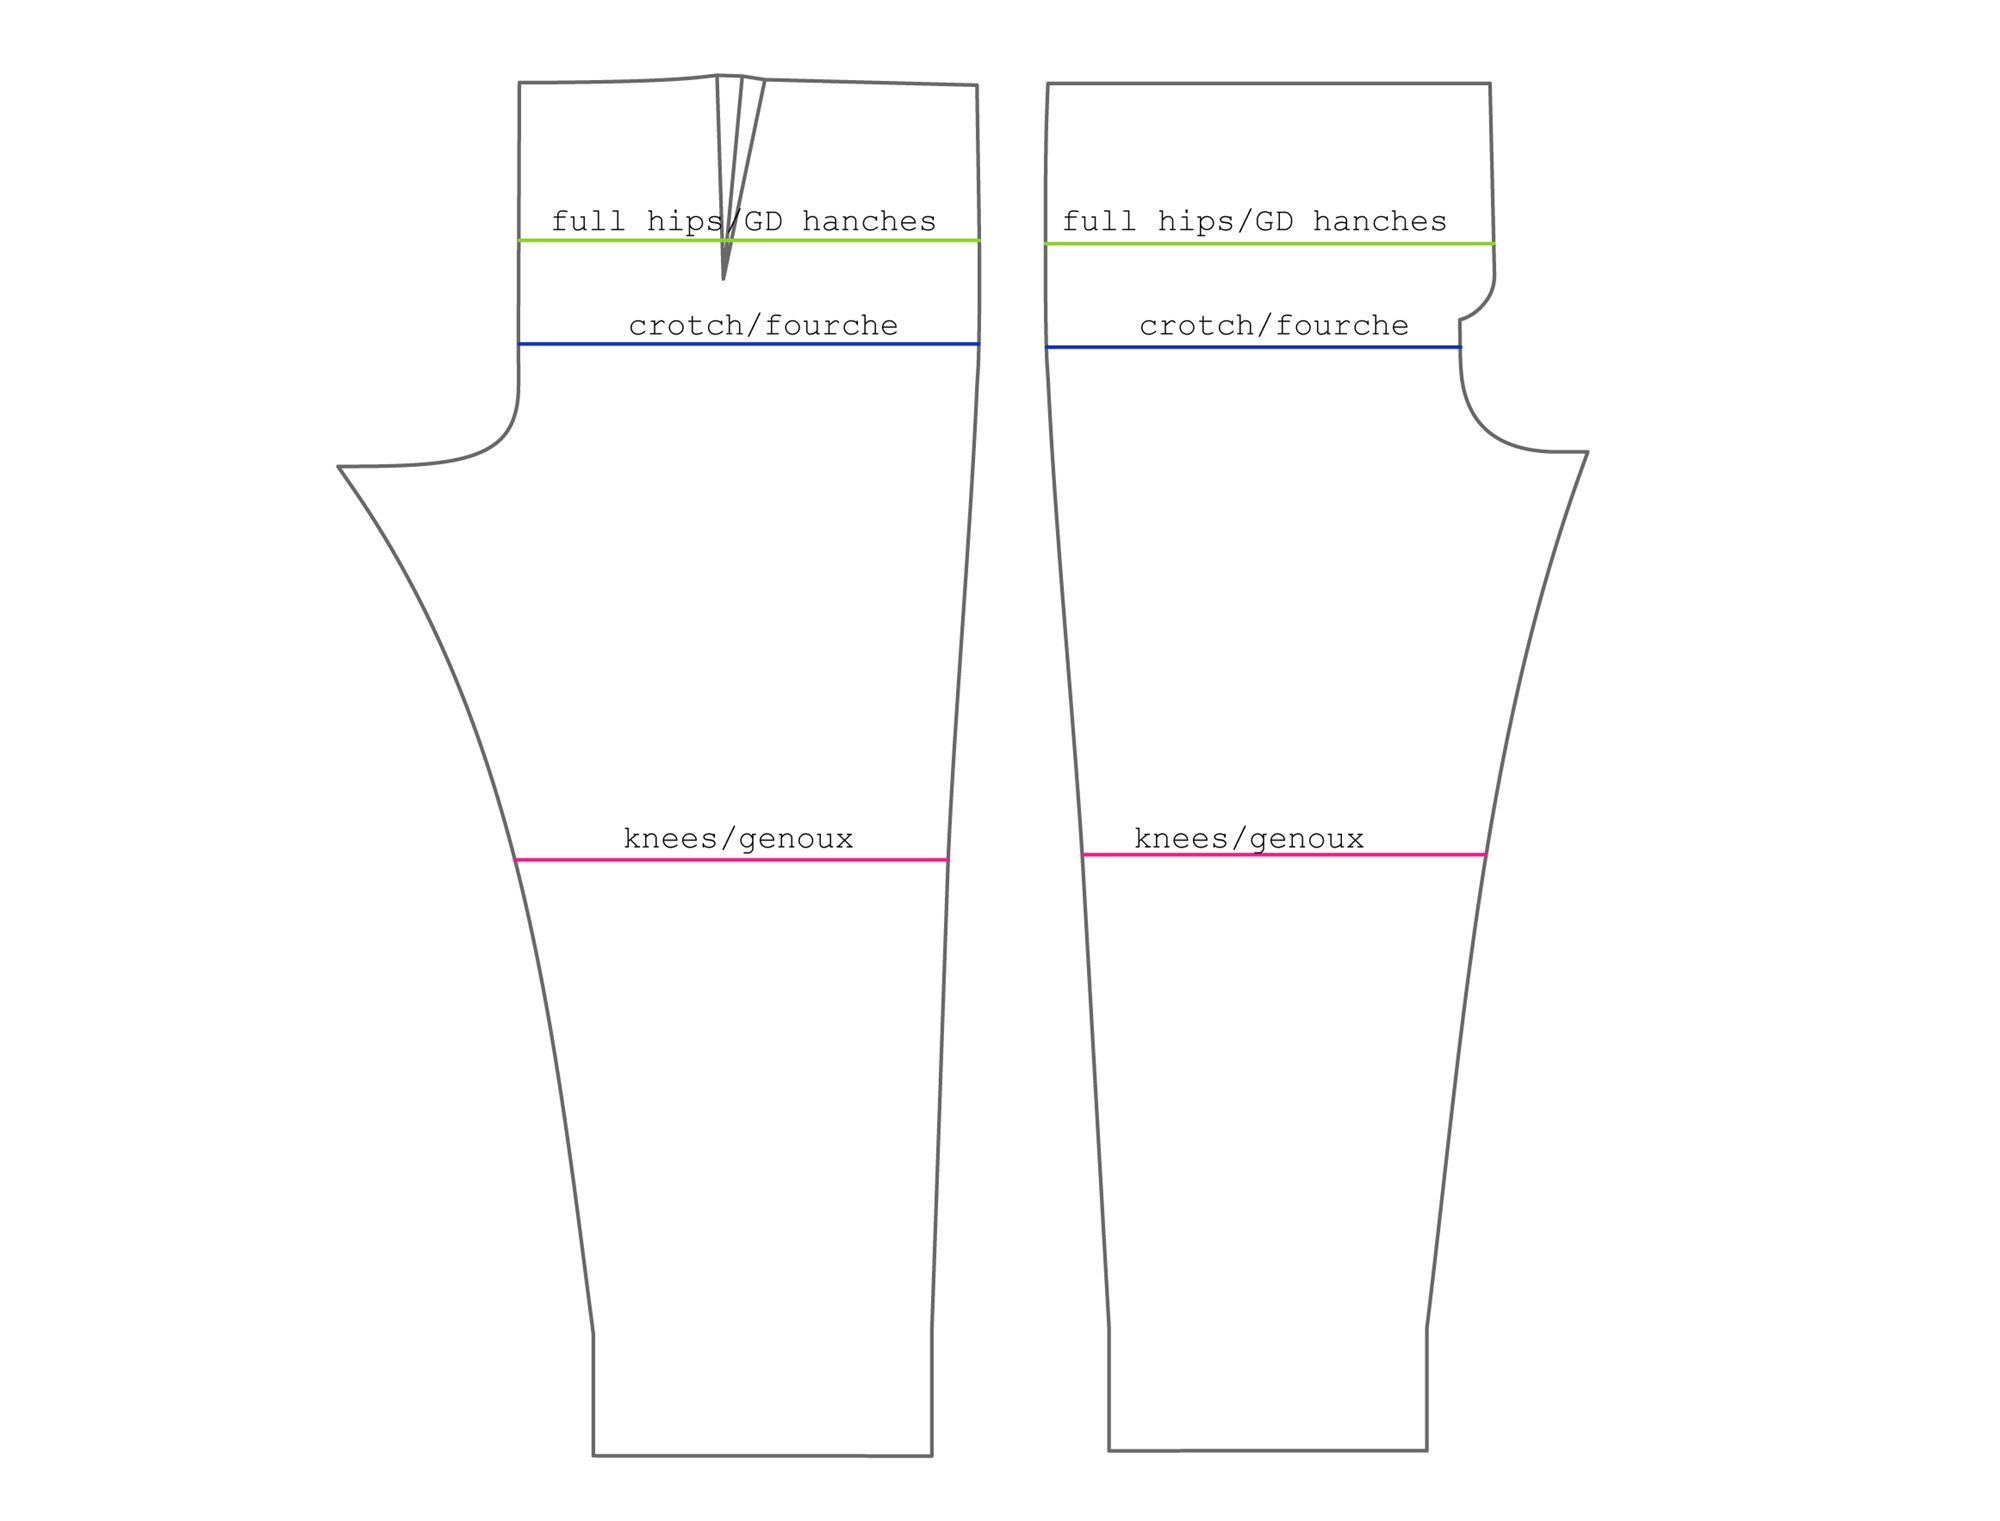
First, let's have a look at the different lengthening/shortening lines on the pattern.
 Lengthening and shortening your pattern pieces is pretty straighforward, find the lengthen / shorten lines and apply your length changes between them. In the case of the Jean-Paul I’ve included four lengthen / shorten lines, this way you can adjust and keep your proportions.
- The full hips line: you will want to work from this line if you need to alter the length between the small hips and the crotch. Note that you will also alter the fly length with this method.
- The crotch line: You will want to work from this line if you need to alter the length between the small hips and the crotch without shortening or lengthening the fly. You will only alter the crotch depth.
- The knee line: You can use this line for small alteration to the length of the legs. You will cut and spread the pattern a little above and below this line.
- The bust line: You will work from this line if you need to alter the length between the bust line and the small hips.
If you have a long or short torso you may want to only adjust the upper portion using the bust line. Maybe your torso fits great but you have long legs. In that case you’d want to adjust the lower portion using the full hips or crotch line. If you’re proportioned evenly but are just taller or shorter than the pattern is drafted (165cm) then we recommend splitting the amount you need to adjust between the upper and lower adjustment lines.
![]()
1 - Illustrated below is the method you will use if you need to proportionaly lengthen the pattern because you are taller than the pattern is drafted for (165cm).
![]() - Cut between the lengthen / shorten lines marked on the pattern. With a piece of paper underneath the pattern, spread the two sections the amount you need to lengthen your piece, making sure to keep the grain line of the two pieces aligned. Trace your piece off onto the paper and re-blend any gagged edges along the side seam. Repeat the adjustment to any other affected pieces.
- Cut between the lengthen / shorten lines marked on the pattern. With a piece of paper underneath the pattern, spread the two sections the amount you need to lengthen your piece, making sure to keep the grain line of the two pieces aligned. Trace your piece off onto the paper and re-blend any gagged edges along the side seam. Repeat the adjustment to any other affected pieces.
- If you’re shortening the all pattern, the same steps apply only rather than spreading the pieces apart, you’ll be overlapping them the amount you need to shorten the pattern.
![]()
2 - Illustrated below is the method you will use if you need to shorten the rise using the full hips line.
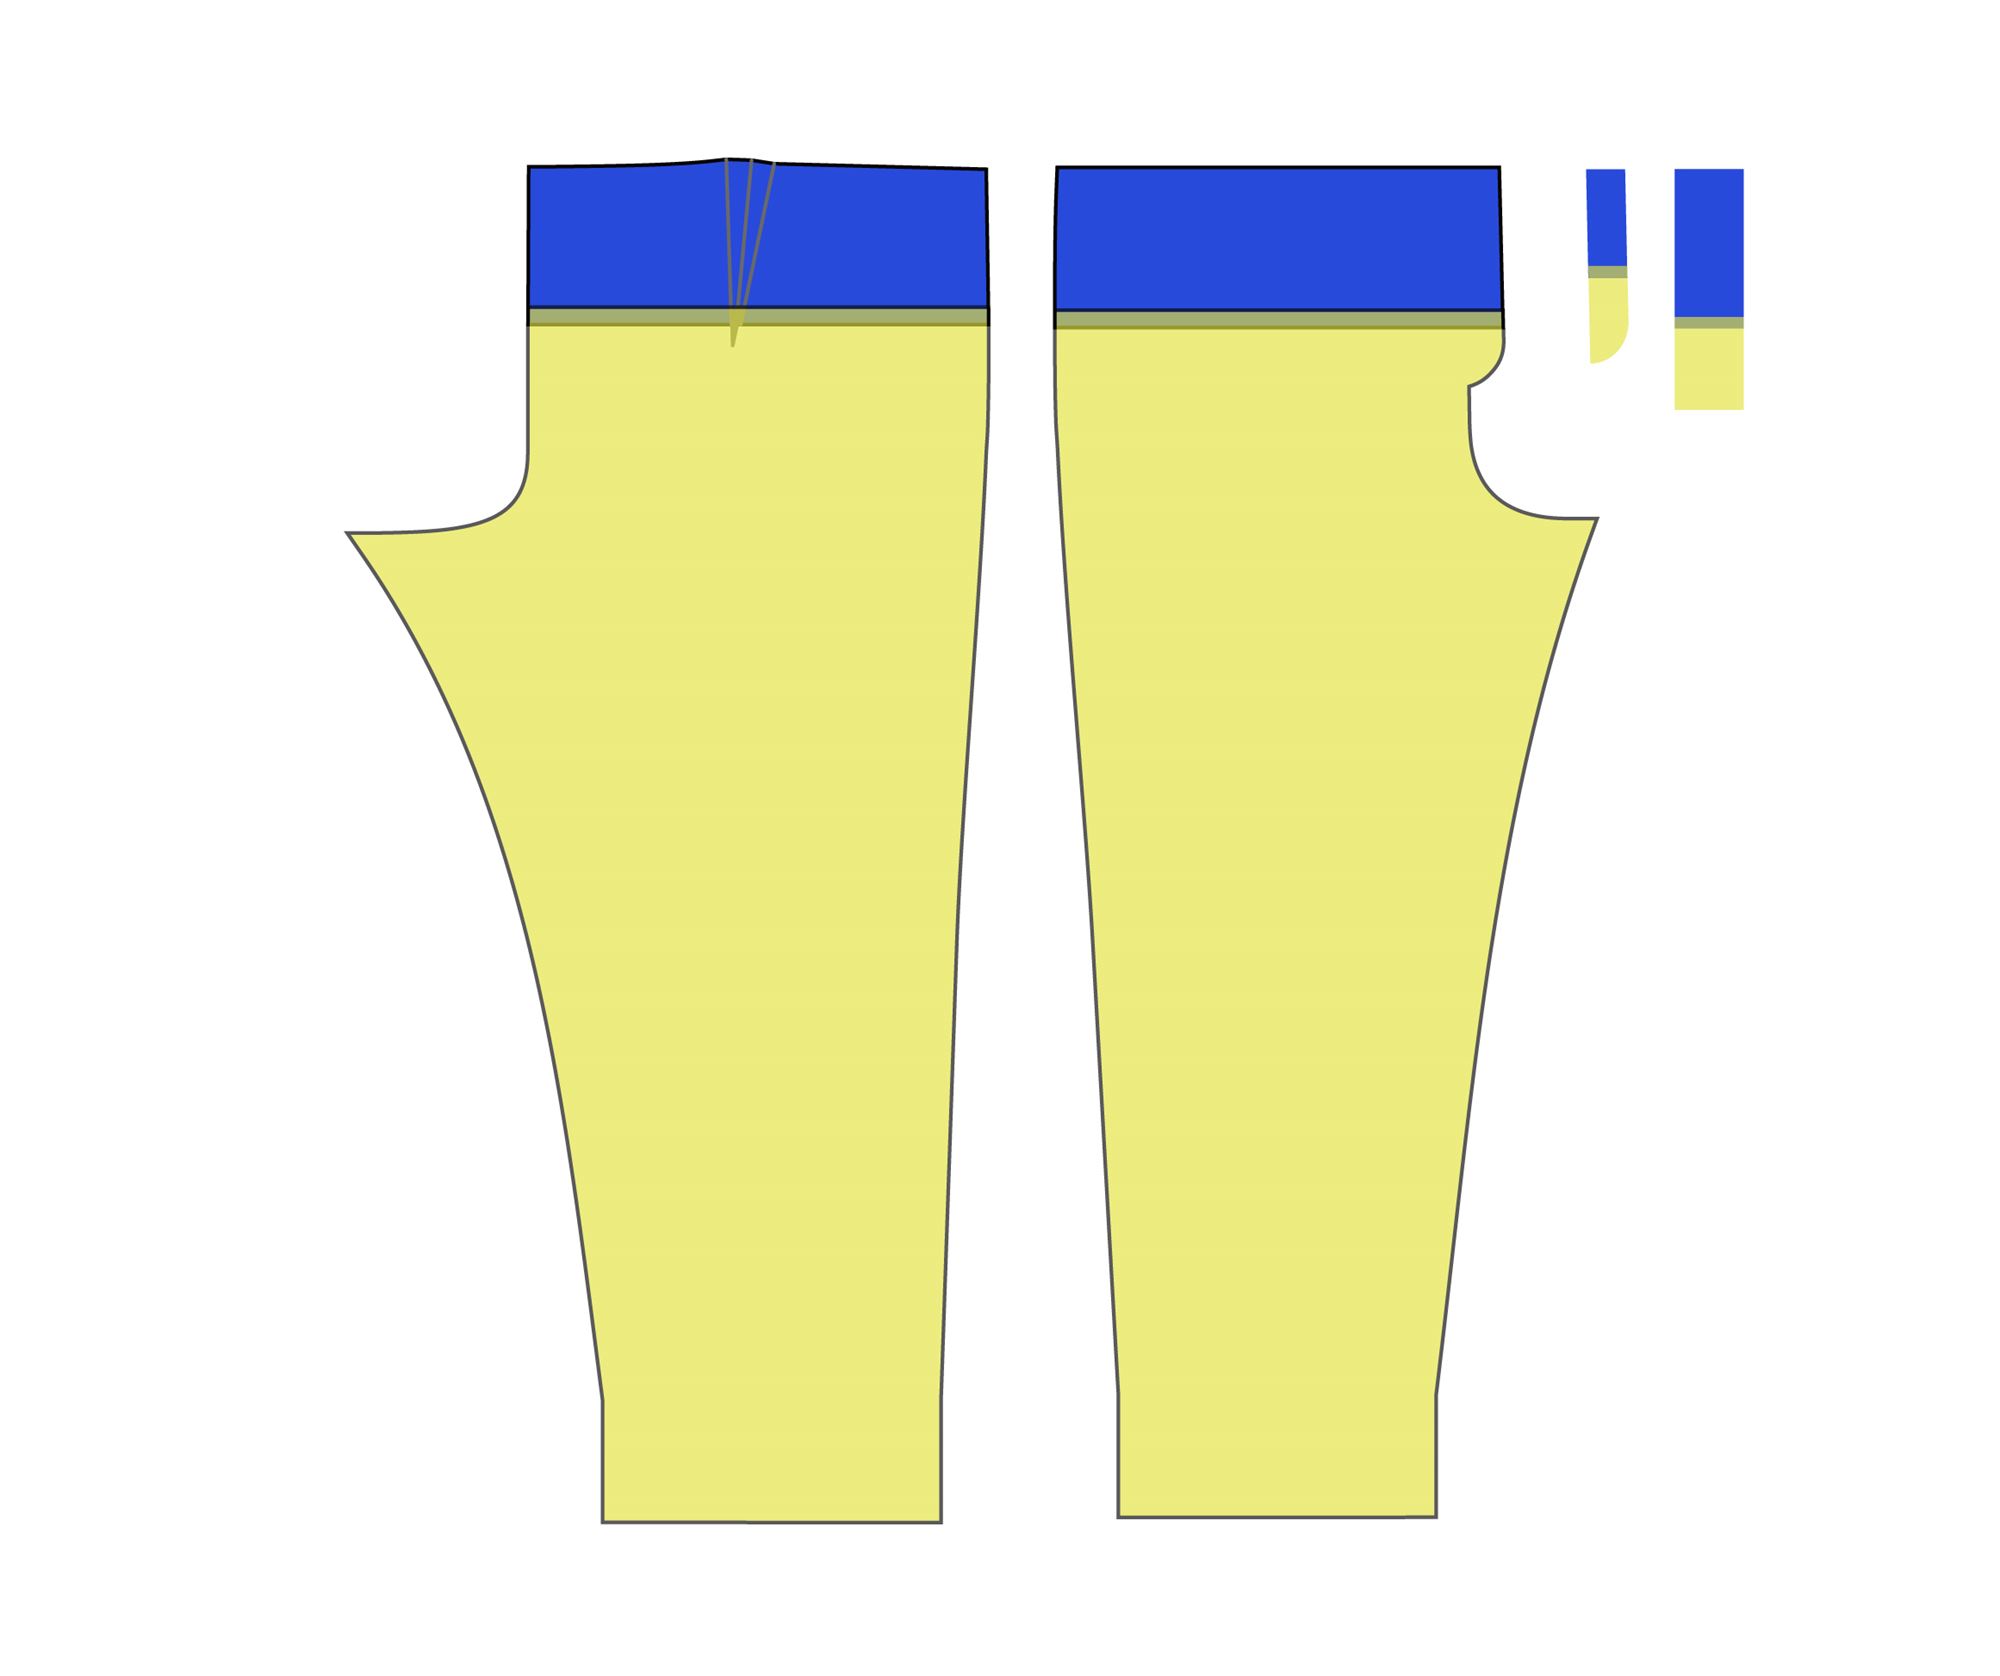
- Cut between the lengthen / shorten lines marked on the pattern. Overlap the two sections the amount you need to shorten your piece, making sure to keep the grain line of the two pieces aligned.
- Re-blend any gagged edges along the side seam. Repeat the adjustment to any other affected pieces like the fly shield and the front and back pockets if needed.
If you’re lengthening the same steps apply only rather than overlping the pieces, you’ll be spreading them the amount you need to lenghten the pattern.
![]()
3 - Illustrated below is the method you will use if you need to blend between sizes.
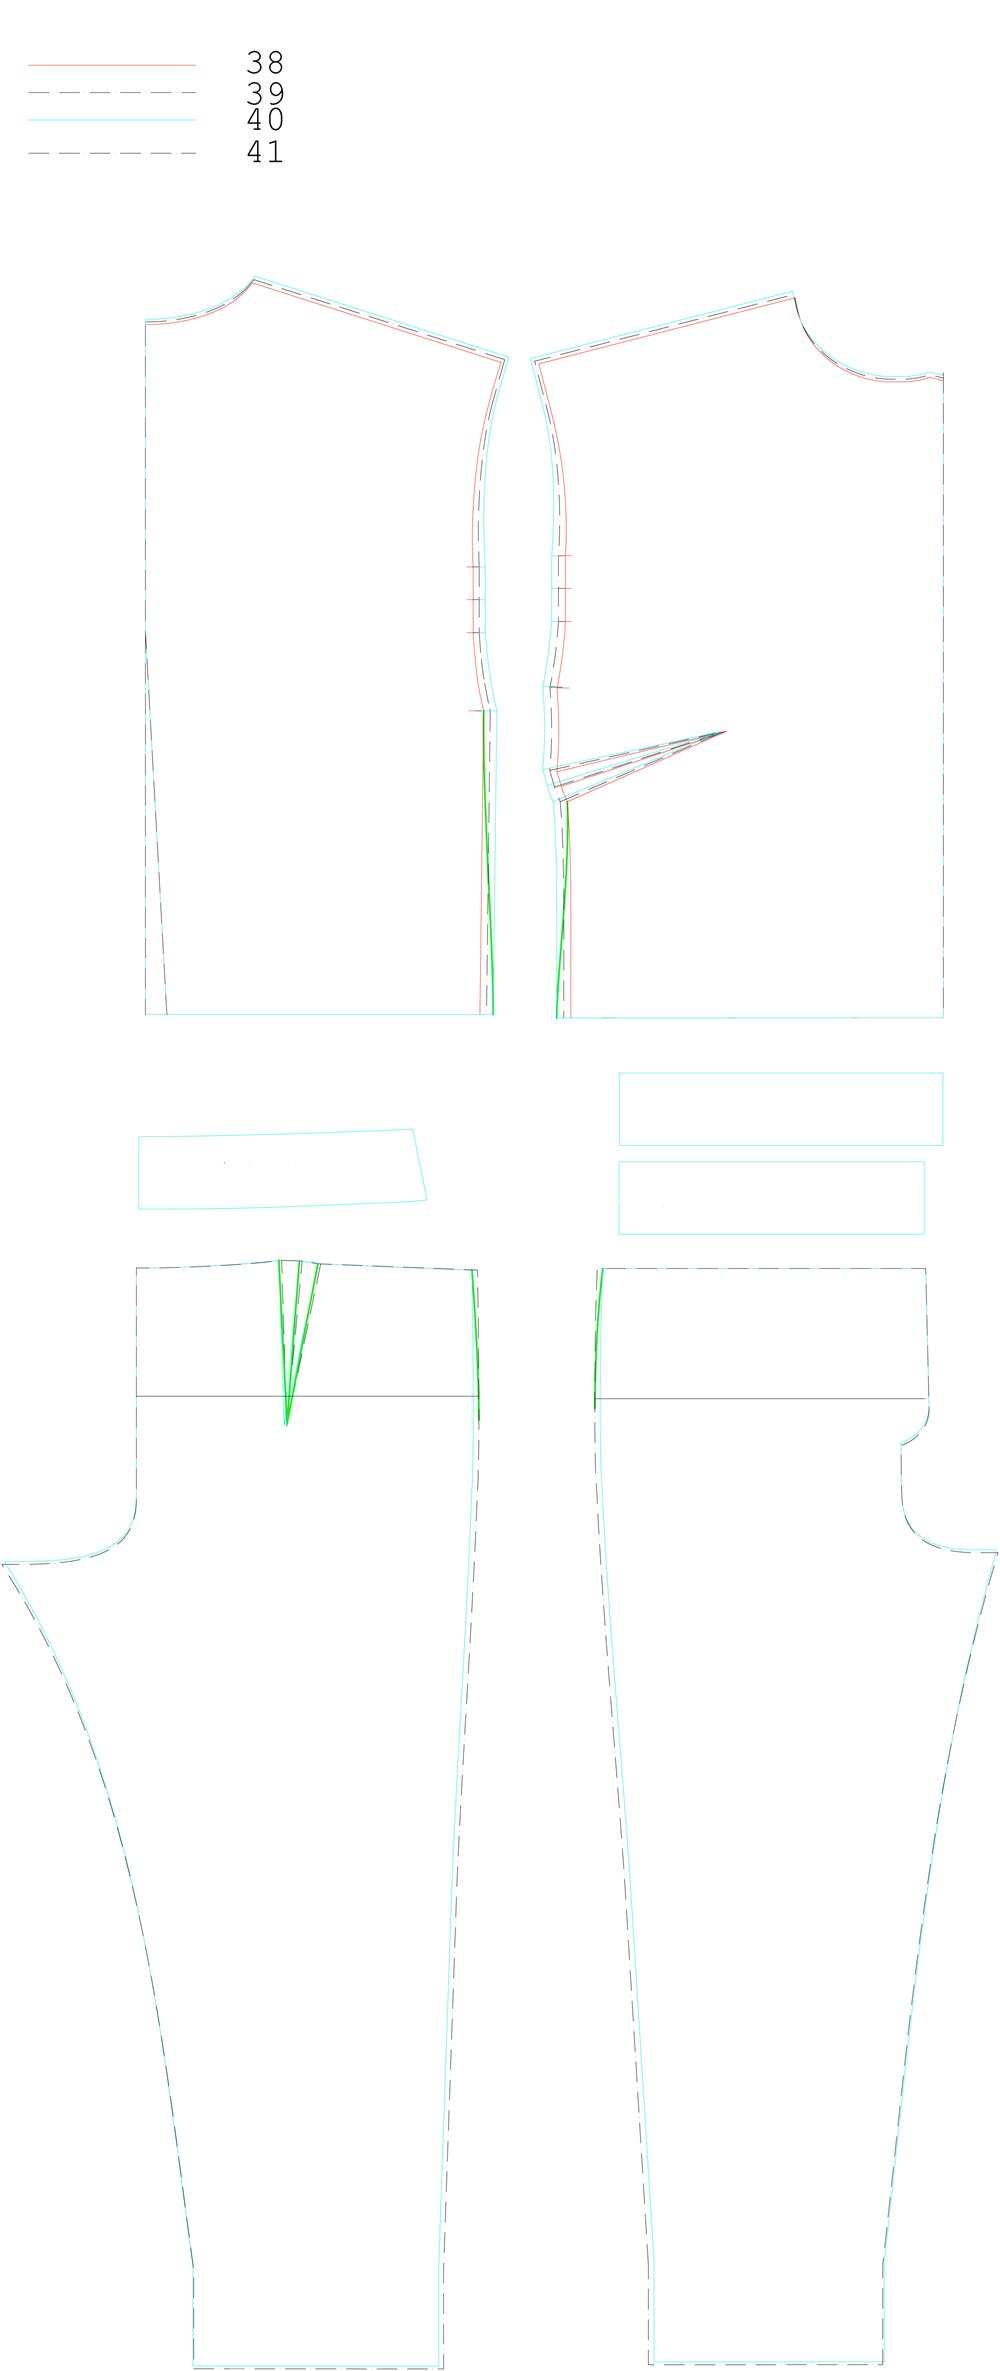
In this exemple, I’m blending from a 38 at the bust to a 40 at the small hips and 41 at the full hips (I’ll be disregarding the waist measurement because the pattern has a pretty straight fit).
The bodice: You’ll want to trace a line from the bottom of the bust dart to the bottom of your bodice from a size 38 to a size 40.
The waistband: You can go straight for the size 40.
The legs: You’ll want to trace a line from the top of the pant to the full hips line from a size 40 to a size 41. You can keep size 41 for the legs or go back to size 40 if you want them narrower.
Make sure that you make any changes to all affected pieces. In this case you would want to do the same blending to the front pockets.
![]()
That’s it for today. If you have any questions on these, let me know in the comments below and I'll try to answer as soon as I can!
![]()
Yes, you need to cut and spread the pattern around the knee line. I have clarified this paragraph.
Happy sewing,
Raphaëlle
I am 5'11 and relatively proportional, so I will need to lengthen the pattern all over (I'm making a size 37). On the "lengthen proportionally" diagram above, I see where you cut the pattern at the full hips and crotch, but am confused about the next two cuts below those. Should I make my cuts at these two areas in the diagram, instead of at the lengthening line near the knee area?
Thank you so much!
If you need to blend between sizes but haven't made any muslin yet, consider using the waistband as your small hips line since the pattern is drafted to be a straight fit with low waistband. The waistband should sit approx on your small hips.
"In this exemple, I’m blending from a 38 at the bust to a 40 at the small hips and 41 at the full hips (I’ll be disregarding the waist measurement because the pattern has a pretty straight fit).
The bodice: You’ll want to trace a line from the bottom of the bust dart to the bottom of your bodice from a size 38 to a size 40 (small hips).
The waistband: You can go straight for the size 40 (small hips).
The legs: You’ll want to trace a line from the top of the pant to the full hips line from a size 40 to a size 41. You can keep size 41 for the legs or go back to size 40 if you want them narrower."
Hope it helped.
Regards,
Raphaëlle