How to alter a pattern to fit your cup size FBA/SBA

Ready to sew's patterns are drafted for a A/B cup so if you differ from that, you might need to do a bust adjustment. If you are a C cup you might be ok, but follow the steps below on measuring your high bust to work it out.
![]()
What is a bust adjustment?
A Full bust adjustment will create more space and ease at the front of the top only, which is done by increasing the size of the dart. It means instead of increasing the circumference of the top all the way around to accommodate the bust (which will make the armholes too big) it just adds more space at the front for the bust. We want to add more fabric so there is enough space for the fabric to go up and over the bust and also around the bust. A small bust adjustment will do the opposite. It decreases the amount of excess fabric over the bust by reducing the size of the dart.
What size should I pick?
Perhaps you have already made the garment and it fits you nicely over the shoulders, neckline, armholes but it is too tight over the bust and it looks like it is squashing your bust, you have draglines between the busts or you have coming from the bust into the side seams. With that situation, you are going to want to stitck to the pattern size you have already made but you are going to do an FBA to give you more space right over the bust area.
If you think you need to do a bust adjustment but you don't know what pattern size to pick first then you need take two measurements:
- - The upper bust: This is the area of your chest right below your underarm.
- - The full bust : This should be around your ribcage and over your bust apex, parallel to the ground.
If the difference between your high bust measurement and full bust measurement is more than 5 cm (2 inches), then it will confirm that you need to do an adjustment.
- 2,5 cm (1″) is a A cup
- 5 cm (2″) is a B cup
- 7,5 cm (3″) is a C cup
- 10 cm (4'') is a D cup
- 12,5 cm (5'') is DD cup
Again, don’t worry if this is very different from your actual bra cup size! Choose your pattern size based on your high bust measurement + 5 cm (2'') because the pattern is already drafted for a B cup.
![]() Ex: Hight bust measurement= 87cm - Full bust measurement= 95 cm - Cup size= C
Ex: Hight bust measurement= 87cm - Full bust measurement= 95 cm - Cup size= C
- - Hight bust measurement + 5 cm (87 cm + 5 cm) = 92 cm you will choose 40 in Ready to sew' size chart.
- - Full bust measurement - 92 cm (95 cm - 92 cm) = 3 cm, this is the amount you have to adjust the pattern by.
As you are working on half of the front bodice you need to half 3 cm, which gives 1,5 cm. This is how much you will adjust the pattern piece by, we call that the bust differential. The following steps apply if you were doing a small bust adjustment too. I will use the pattern Jily as an exemple for this tutorial.
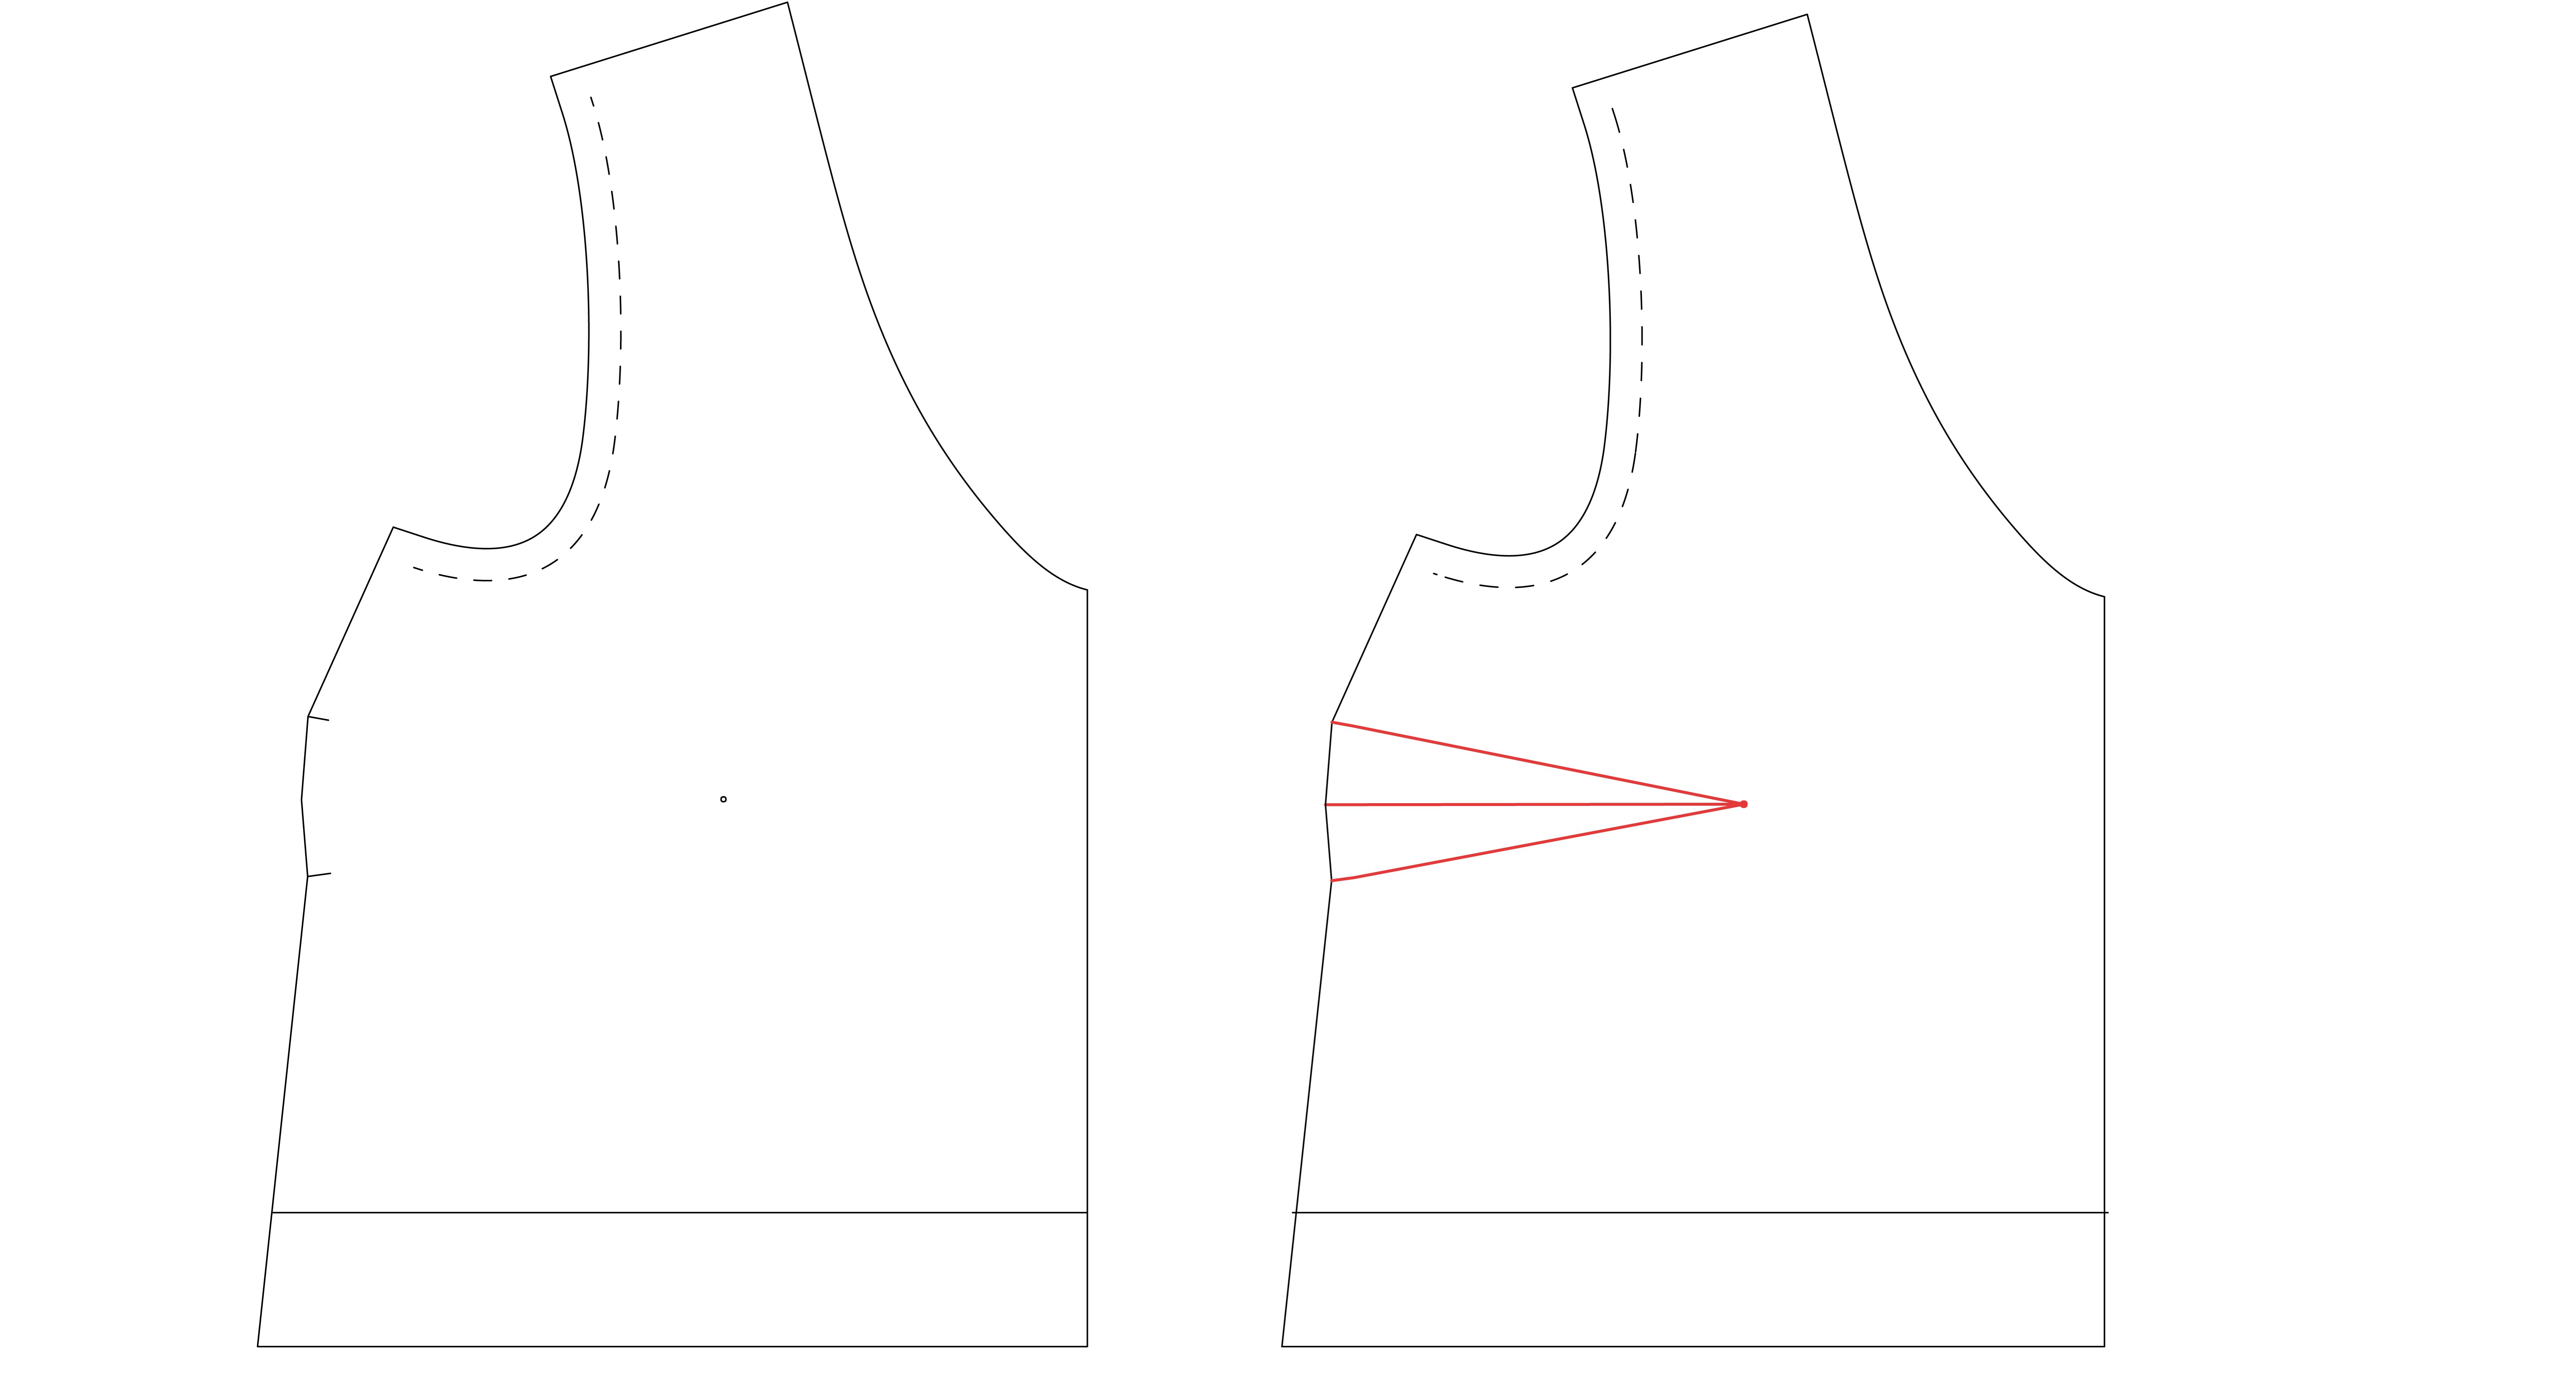
Step 1
- Prepare your pattern by tracing the front bodice, transferring all darts, notches, and markings. Also mark the sewing line at the armscye.
- Trace your bust dart.
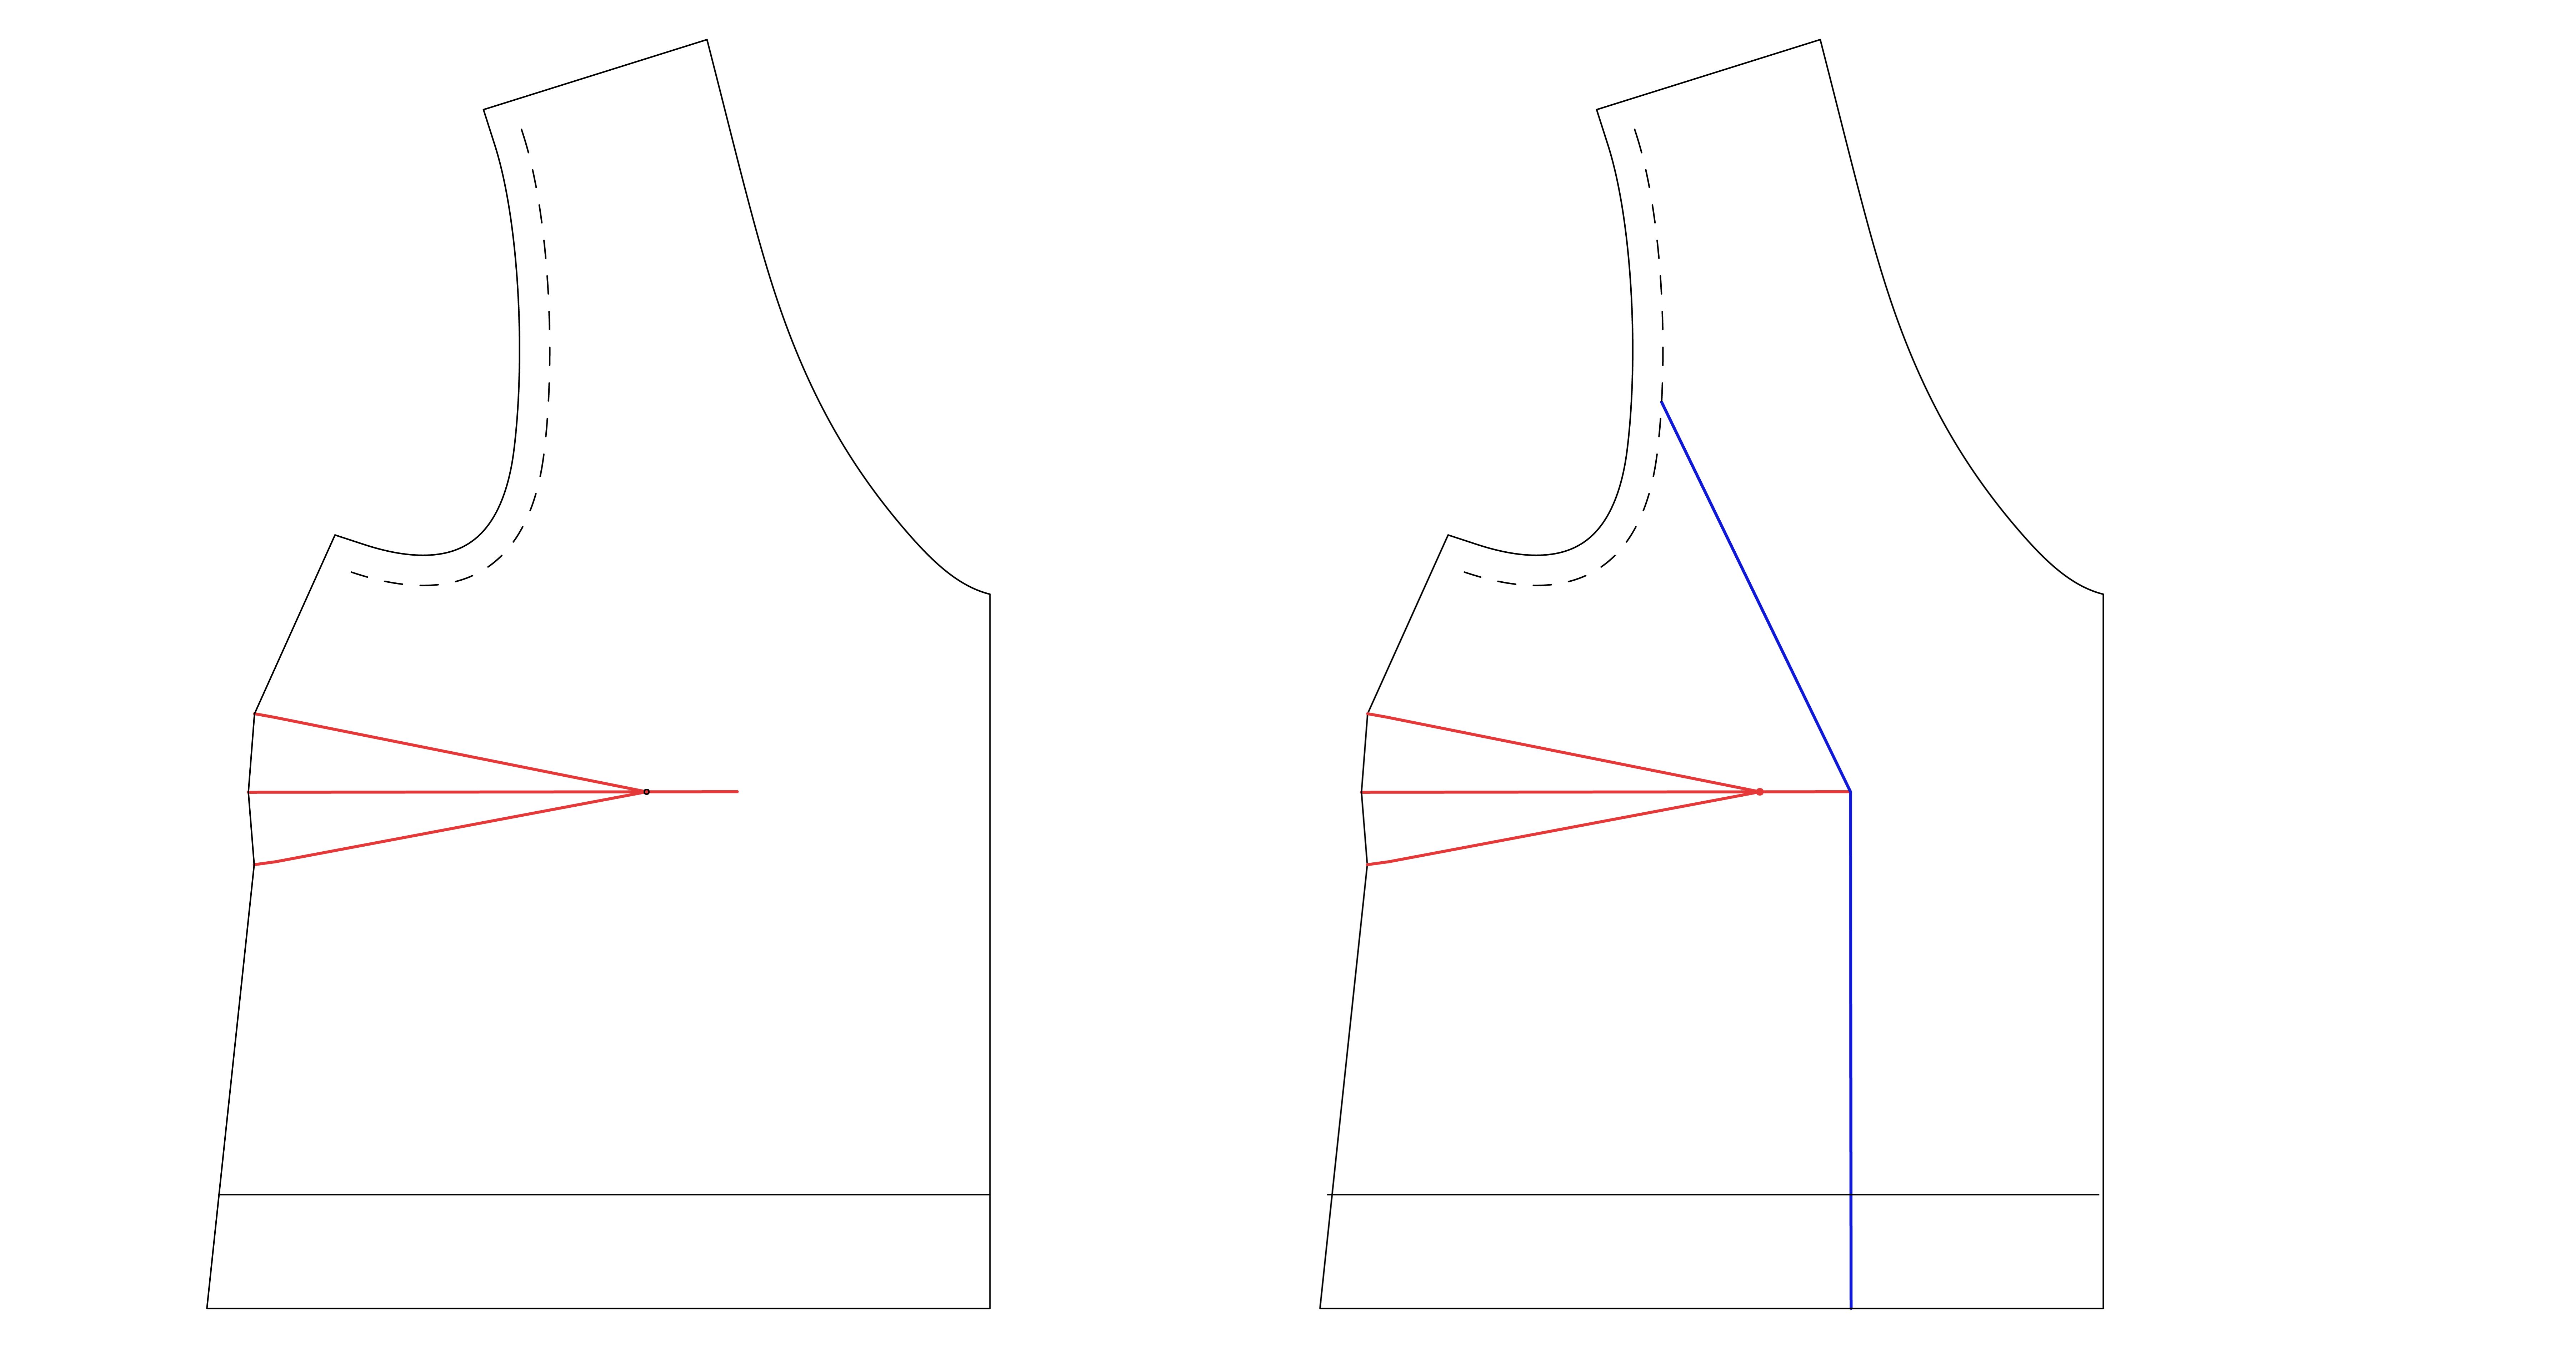
Step 2
- Extend the central line of your bust dart by 3 cm.
- Draw a line from the bust point to the hem of the top. This line should be parallel to the grainline.
- Draw a third line from the bust point to the armscye sewing line (at roughly the center point).
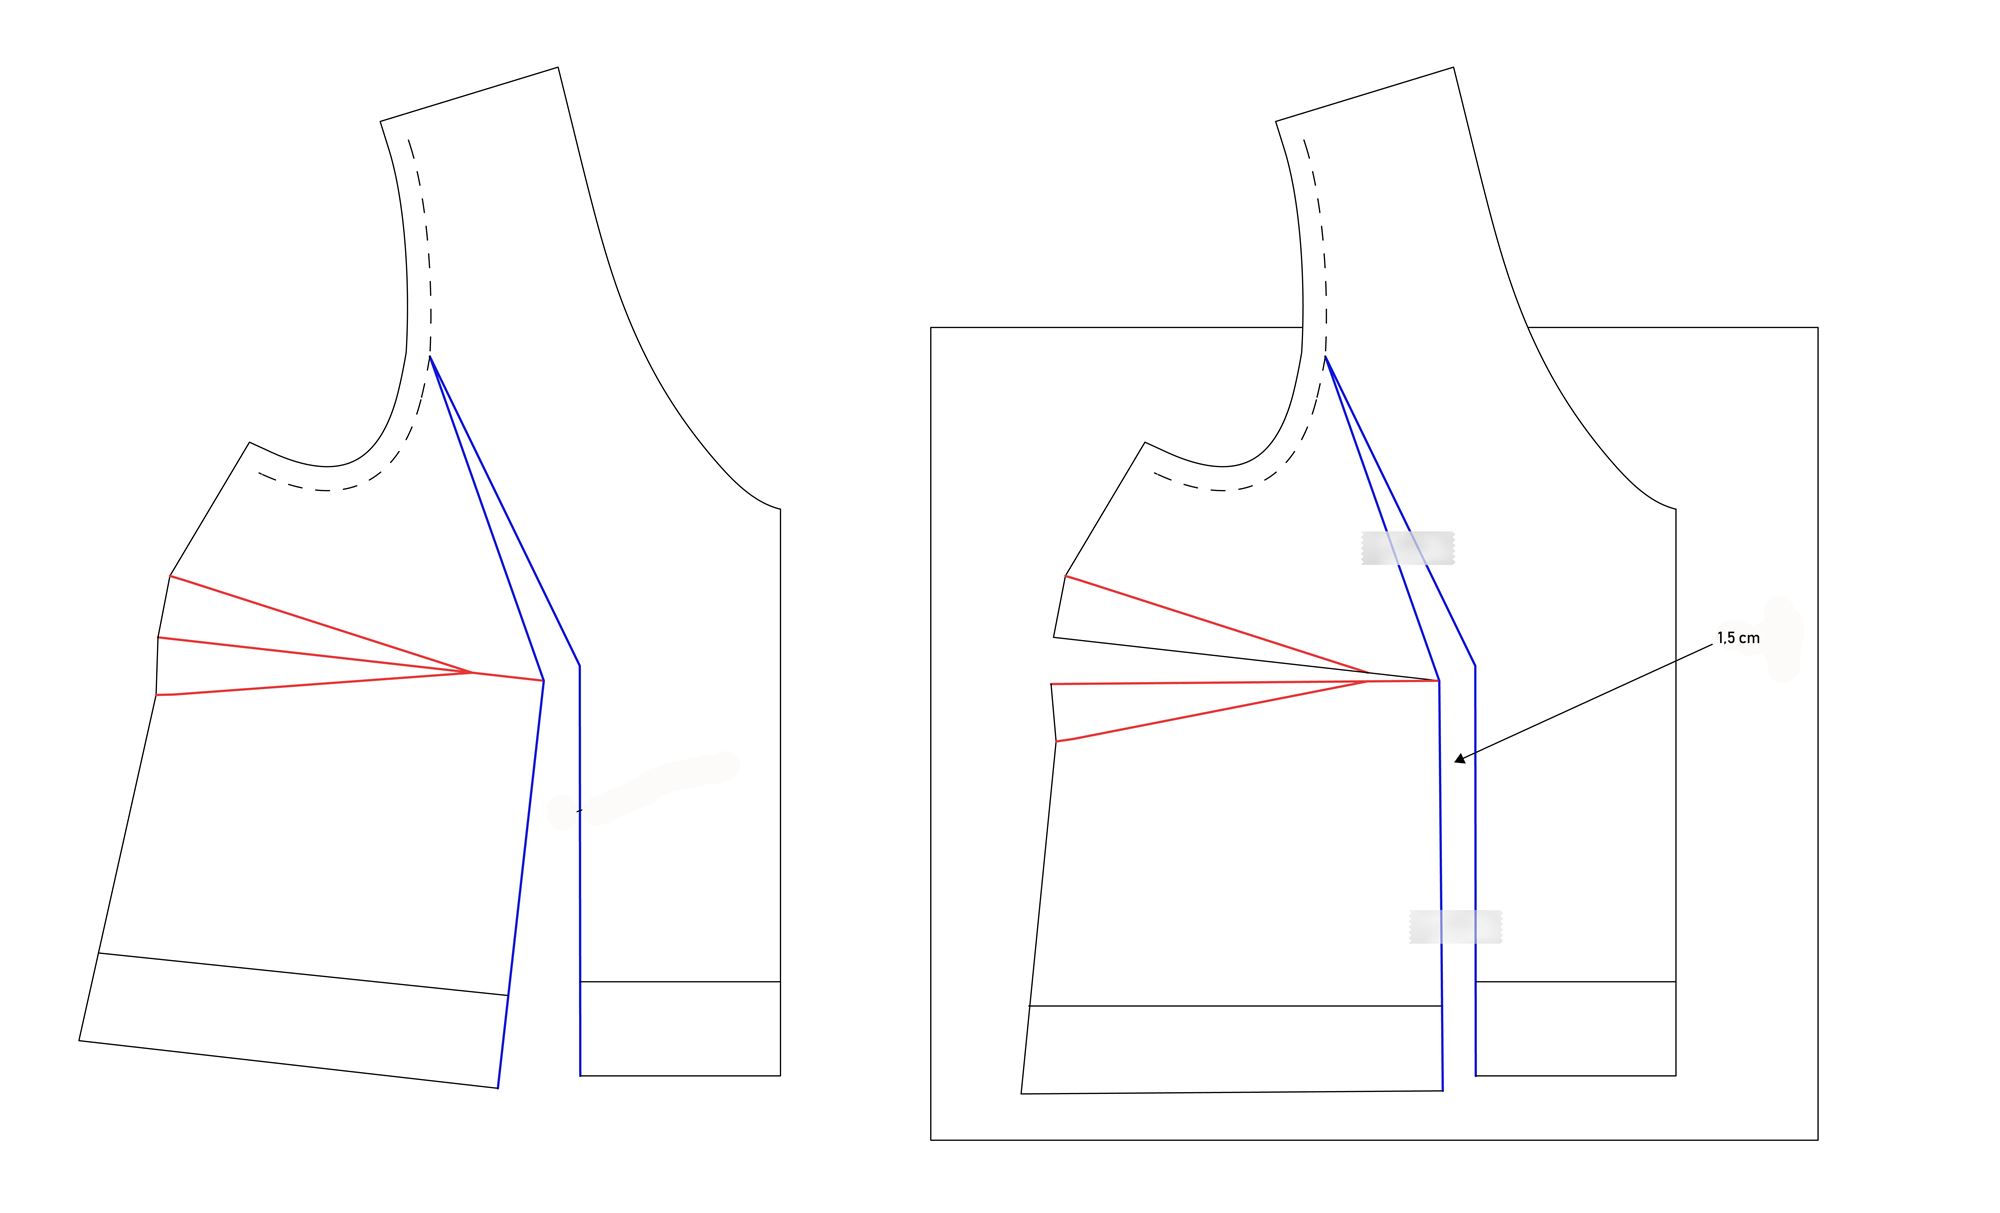 Step 3
- Cut through the blue line.
- Cut through the red line starting at the side seam, leaving a small paper hinge at the bust point.
- Now the pattern is slashed and ready to be opened up the desired amount (bust differential).
- The hinge that you created at the side dart should allow you to maneuver your blue lines so that they lay parallel.
- Spread the side part of the bodice away from the centre and measure the distance between the two edges of the vertical line you cut. Make it the same amount that you had to increase your bust measurement by.
- Carefully tape down your pattern to another sheet of paper.
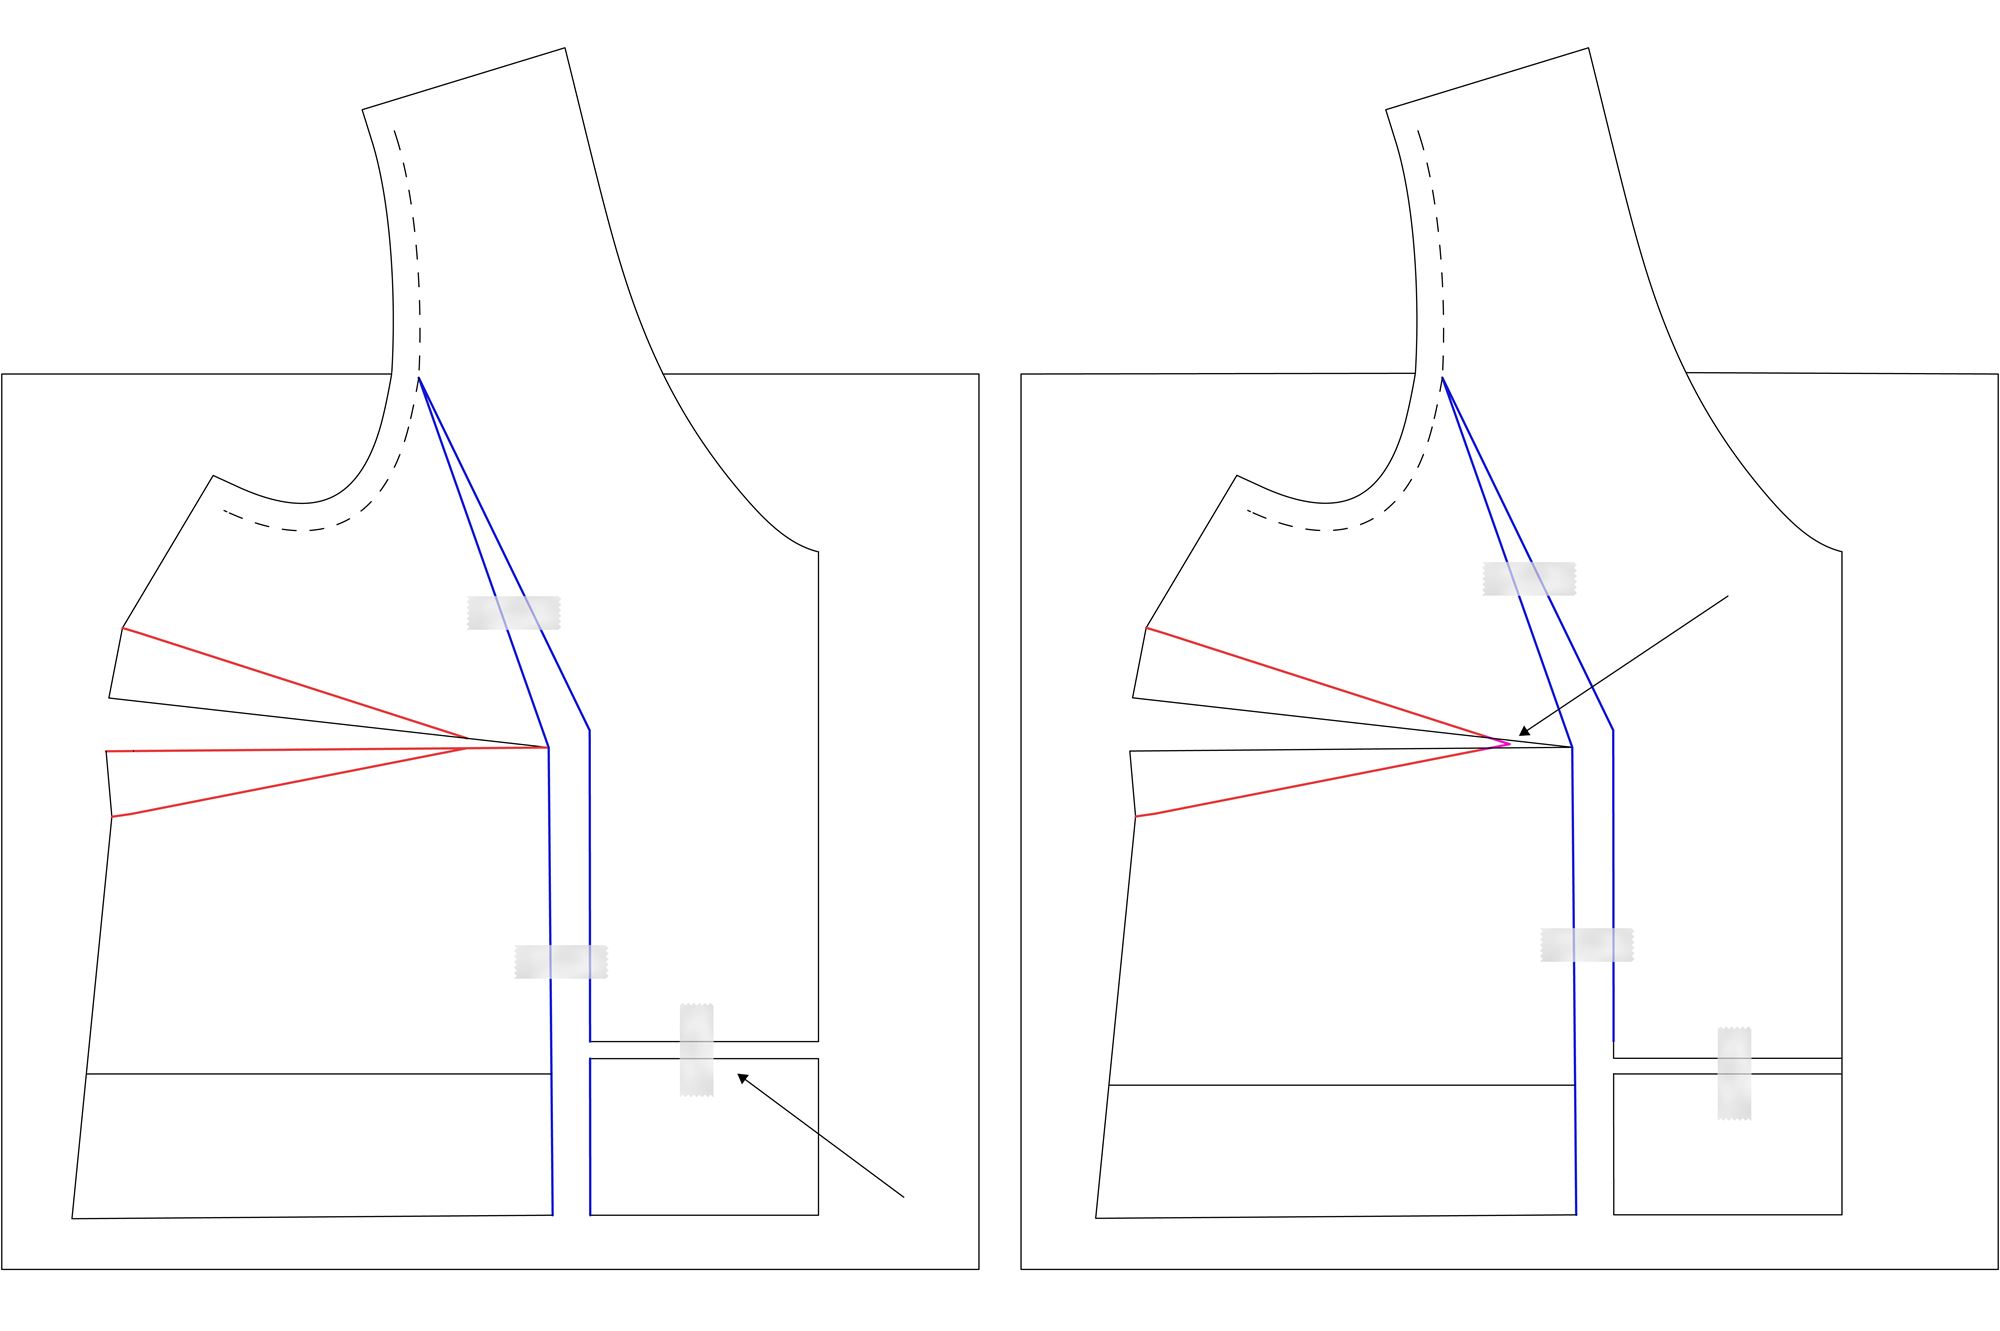 Step 4
- Use the lengthen/shorten line on the center front to lengthen the center front so that the hem aligns with the side front.
- Redraw dart legs by extending the existing dart lines to meet.
 Step 5
- You will notice that we have added width to the waistline, if you want to get rid of that width, trace a line from the bottom of the dart to the original side waistline. If you are making the Jily top you can keep that width and adjust the bottom of the pattern (step 6).
- Trace your pattern on a new sheet and transfer all notches.
- Don't forget to label this new pattern piece so you won't forget the adjustments you've made. It can be something like (FBA = total 3 cm).
 Step 6
- If you're working on the pattern Jily, you will nedd to adjust the front hem band width and trace a new facing.
- Measure the width of the bottom of the front bodice and adjust the bottom band according to it.
 Step 7
- Draw your new front facing using some tracing paper. In order to do this, measure down 5 cm on the center front, and 5 cm on the side seam, and connect the two using a shape as shown below.
- Copy all the markings from your original pattern to your facing pattern.
- You now have your new front bodice pattern piece, ready for toiling to check the fit.
![]()
NOTE: If you want to lower the bust dart, follow this tutorial. If you need to make a SBA (small bust adjustment) instead of spreading the pattern, overlap it by the amount you need to reduce by, this will make the size of the dart smaller.
![]()
Il semble, d'après vos mesures et la description de vos problèmes que l'ajustement petite poitrine ne soit pas une solution. Si mon analyse est correcte, vous êtes plus large de dessus de poitrine que de poitrine et vous avez très peu voir pas de poitrine. Dans ce cas, inutile de faire un ajustement petite poitrine, le mieux serait de choisir un modèle sans pince poitrine ou bien de supprimer les pinces poitrines et de choisir votre taille de buste en fonction de votre tour de dessus de poitrine.
Si votre tour de poitrine est plus petit que votre tour de dessus de poitrine et que vous choisissez vos modèles en fonction de la mesure la plus petite, vous choisissez une taille trop petite à chaque fois et c'est la raison pour laquelle vous n'êtes pas à l'aise dans vos cousettes.
Donc, je récapitule, si vous n'avez pas ou très peu de poitrine et que votre tour de dessus de poitrine est plus large, choisissez votre taille en fonction de votre tour de dessus de poitrine et supprimez la pince poitrine (je pense qu'il y a des tutoriels à ce sujet sur internet).
J'espère vous avoir aidé! Bonne couture, Raphaëlle
Est-il possible que la différence entre le tour haut de poitrine et le tour de poitrine soit négative ?
86 cm pr le haut et 83 pour la poitrine. Ça expliquerait pourquoi je ne me sens pas à l'aise dans la plupart des hauts que je couds malgré un choix en fonction de ma poitrine.
Est-ce que c'est le signe qu'il faut faire un ajustement petite poitrine en suivant la logique inverse de votre tuto ?
Merci en tout cas pour ces précieux conseils
Oui vous pouvez couper la pièce dos de Jily en une seule pièce. Le modèle sera juste un peu plus gourmand en tissu. Pensez à enlever les 1 cm de marge de couture avant de couper votre patron au pli.
Je vous invite à me contacter par email avec des photos pour que je puisse vous aider.
Belle journée,
Raphaëlle
J'ai une problème d'emmanchure dos qui baille. Est-ce en rapport avec un problème de bonnet? Je fais un petit bonnet C. Je n'ai pas fait de FBA car le devant est très bien. J'ai juste abaissé la pince poitrine de 2 cm selon votre méthode. C'est la première fois que j'ai ce genre de problème avec un patron. Pourriez-vous m'éclairer? Merci par avance. Sylvie
Je pense que vous devez raccourcir la longueur de la pince poitrine dans un premier temps et toujours terminer sans point d'arrêt avec quelques points dans le vide à la fin.
Pour ce qui est de votre deuxième problème, je ne suis pas certaine de bien comprendre, sans photo c'est compliqué. Il se pourrait que le buste soit trop petit mais je ne suis pas certaine.
Bon weekend,
Raphaëlle
-1: j'ai une forte poitrine (bonnet G soit 98cm) pour un tour de taille et une mesure sous poitrine de 76cm. Du coup les triangles formés par les deux pinces sont larges, ce qui a pour incidence de créer un "téton" au niveau de la pointe de la pince ( l'angle est élevé). J'ai essayé de finir la pince par une courbe et sans point d'arrêt, ce qui atténue le problème mais pas complètement... Avez-vous une astuce ? Le style Madonna ce n'est pas mon truc hihi!
-2 second souci: lorsque je lève les bras le tissu remonte et reste coincé sur la poitrine, y a-t-il une solution ?
Merci à vous !