How to alter the Jazz pattern

The patterns for the Jazz e-book are drafted for a B cup and an average hight of 165cm so if you differ from that, you might need to do some pattern adjustments. In today's post we will see how to choose the right size and make any needed pattern modifications before you cut into your fabric.
- Lengthening or shortening the pattern
- Grading between sizes
- Enlarging sleeve
- Lowering the bust dart
- Making a full bust adjustement on dartless bodice
- Making a full bust adjustement on a bodice with dart
 Lengthening or shortening the pattern
 Lengthening and shortening your pattern pieces is pretty straighforward, find the lengthen/shorten lines and apply your length changes between them. Cut between the lengthen/shorten lines marked on the pattern. If you need to lengthen, lay a piece of paper underneath the pattern, spread the two sections the amount you need to lengthen your piece, making sure to keep the grain line of the two pieces aligned. Trace your piece off onto the paper and re-blend any gagged edges along the side seam. Repeat the adjustment to any other affected pieces. In the case of the Jazz jumpsuit/dress, I’ve included several lengthen/shorten lines, this way you can adjust and keep your proportions.
1 the bodices:
- You will want to work from this line if you need to make a torso alteration.
2 the skirts:
- First line: you will want to work from this line if you need to alter the length between the waist and full hips. Note that you will also alter the length of the pocket opening.
- second line: You will want to work from this line if you want to make the skirt longer or shorter without altering the pocket.
3 the shorts/pants:
- First line: you will want to work from this line if you need to alter the length between the waist and full hips. Note that you will also alter the length of the pocket opening and facing T.
- second line: You will want to work from this line if you want to alter the length between the full hips and crotch without altering the pocket and facing T.
- Third line: You can use this line for small alterations to the length of the legs.
NOTE: If you have a long or short torso you may want to only adjust the upper portion using the bust line. Maybe your torso fits great but you have long legs. In that case you’d want to adjust the lower portion using the full hips or crotch line. If you’re proportioned evenly but are just taller or shorter than the pattern is drafted (165cm) then I recommend splitting the amount you need to adjust between the upper and lower adjustment lines.
Grading between sizes
 In this exemple, I’m blending from a 36 (bust) to a 38 (waist) and 42 (full hips).
The bodices:
Print the bodice size 36 and 38.
Dartless bodice: You’ll want to trace a line from the underarm to the bottom of your bodice from a size 36 to a size 38.
Bodice with dart: You’ll want to trace a line from the bottom of the bust dart to the bottom of your bodice from a size 36 to a size 38.
Repeat for the back bodice.
 The bottom:
Print the front leg size 42. Mark a point 2 cm in from the side pant and trace from that point to the pocket opening (just before the curve). Repeat for the pocket facing and pocket pouch. Adjust your back pant/dress according to the front. Why 2 cm? Because the difference between size 38 and 42 is 8 cm but we need to divide this number by 4 because we are working on the half front of the shorts/pants/skirts.
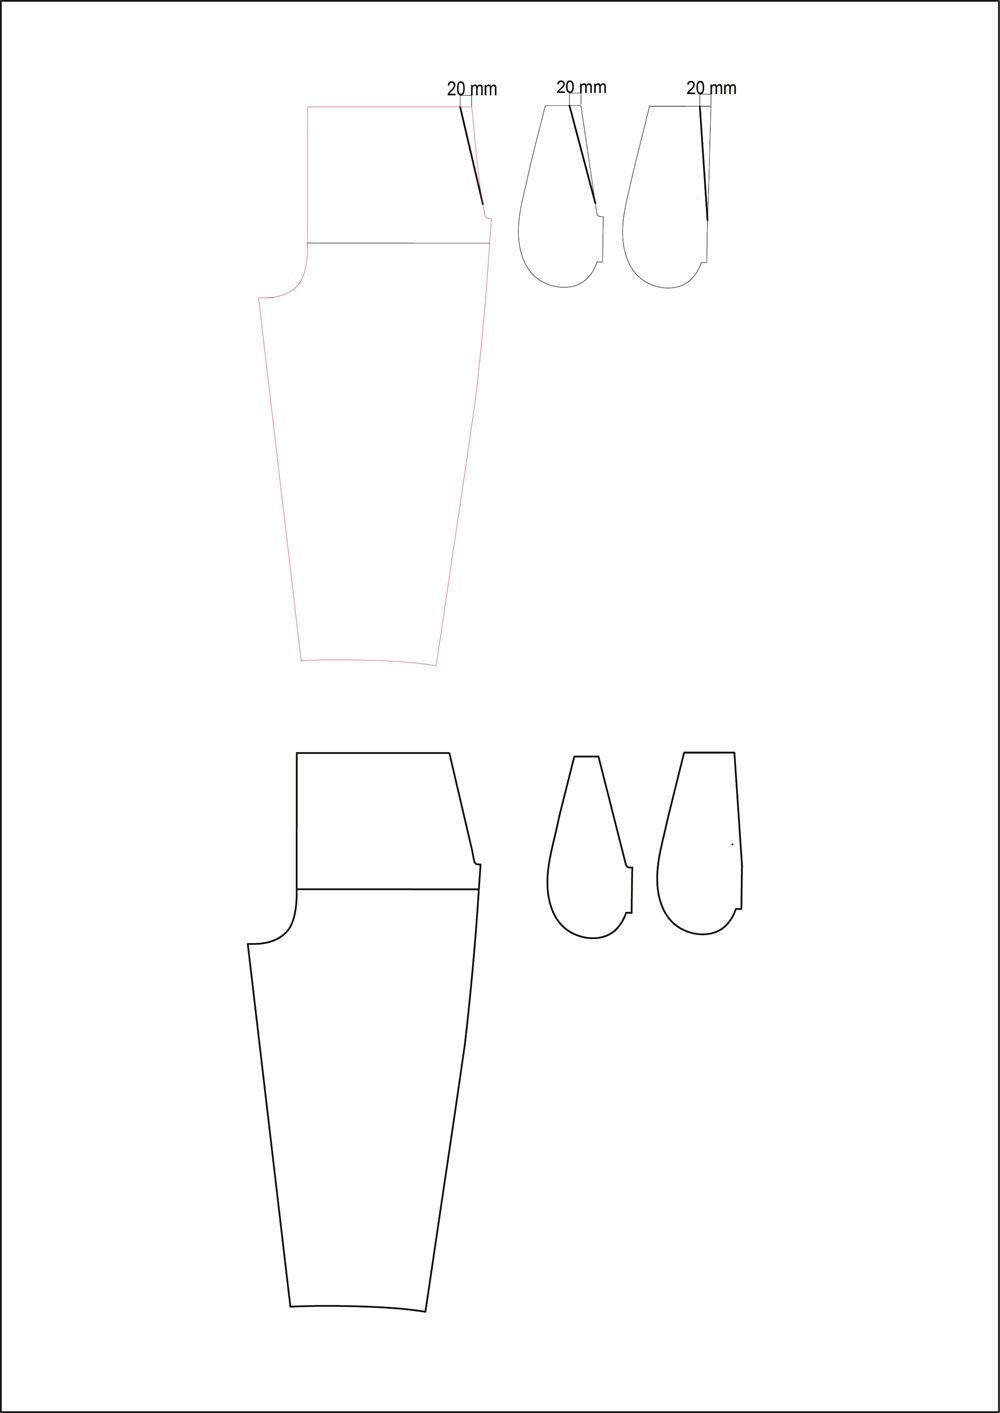
Full bicep adjustement
Now, we are going to cover how to adjust the width of the sleeve for larger arms. This is called a full bicep adjustment. If your sleeve fits snugly, this is how you can adjust the width.
Step 1:
Trace your pattern piece with seam allowance (1 cm for the sleeve cap and 1,5 cm for the sides) and markings.
Step 2:
Draw a line from the top notch of the sleeve cap down to the sleeve hem, parallel with the grainline. Then, draw a line that crosses this one at a 90 degree angle approx 3 cm under the end of the sleeve cap curve.
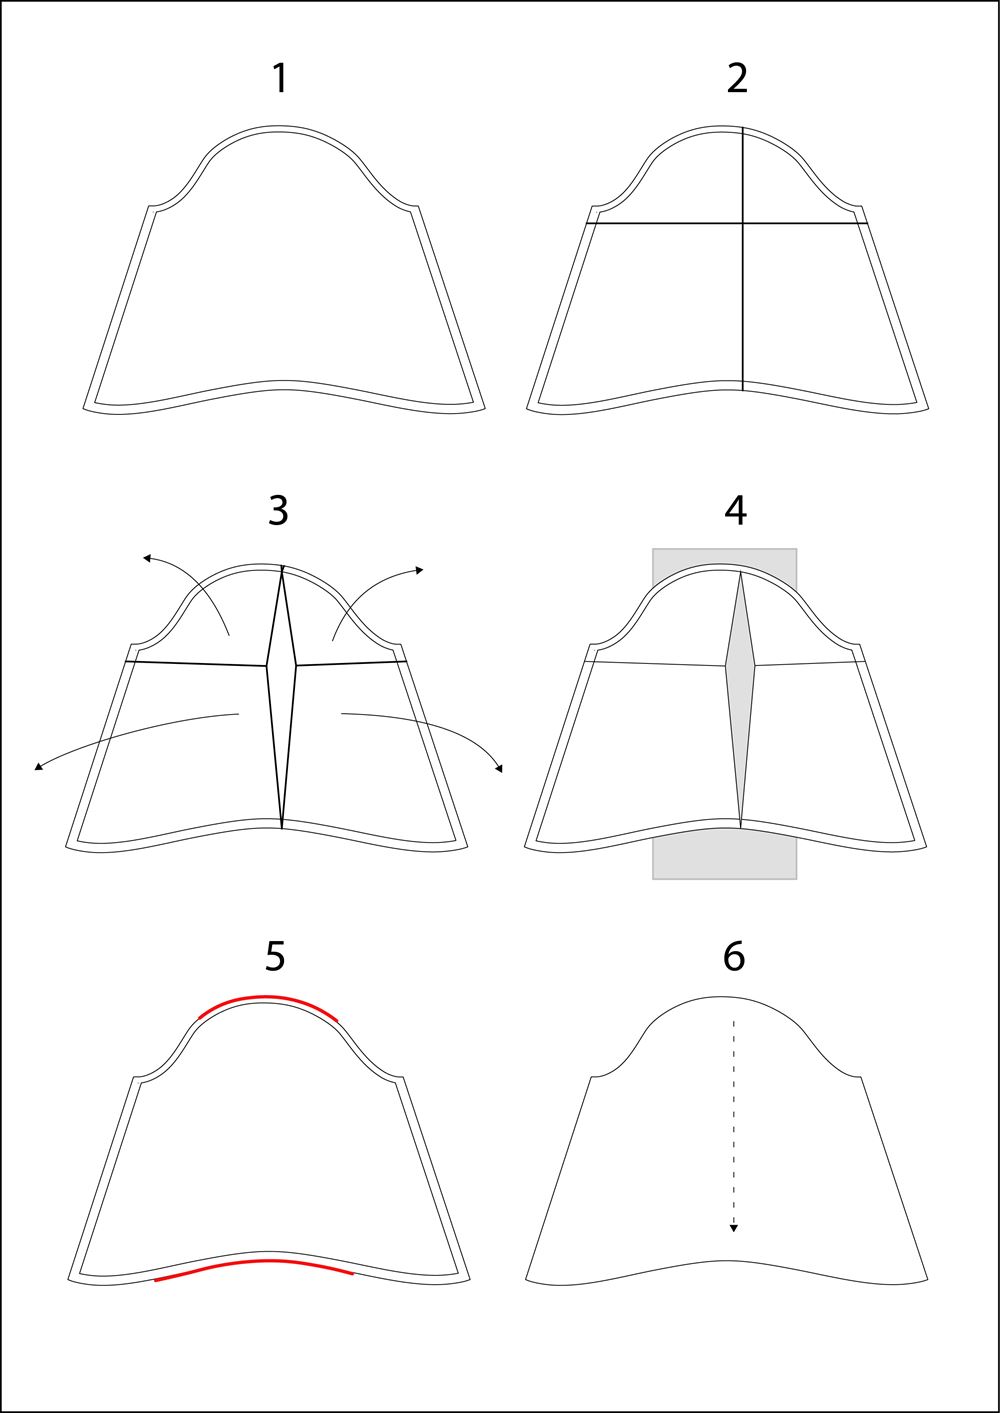
Step 3:
Cut the first line from the hem all the way up, stopping at the sleeve cap seam allowance (leaving a little hinge). Cut the second line, starting at the middle and working out, again stopping at the seam allowance on each side.
Pin the bottom of the sleeve piece, either side of the cut. Spread each of the four pieces outwards, creating a space down the middle of the sleeve. The top pieces will overlap the bottom pieces a bit. Continue spreading until the widest part of the gap at the bicep equals the amount of extra space you need (max 2,5 cm).
Step 4:
Place a piece of paper behind the gap you created, and tape it down to the pattern to hold everything in place.
Step 5:
Smooth out the sleeve cap and hem so it is a nice curve again.
Step 6:
Trace off your final adjusted piece.
As you added some length to the sleeve cap, you’ll need to adjust your armscye accordingly. The two ways to do this are to deepen the armhole and/or add to the underarm seam.
Lowering the bust dart
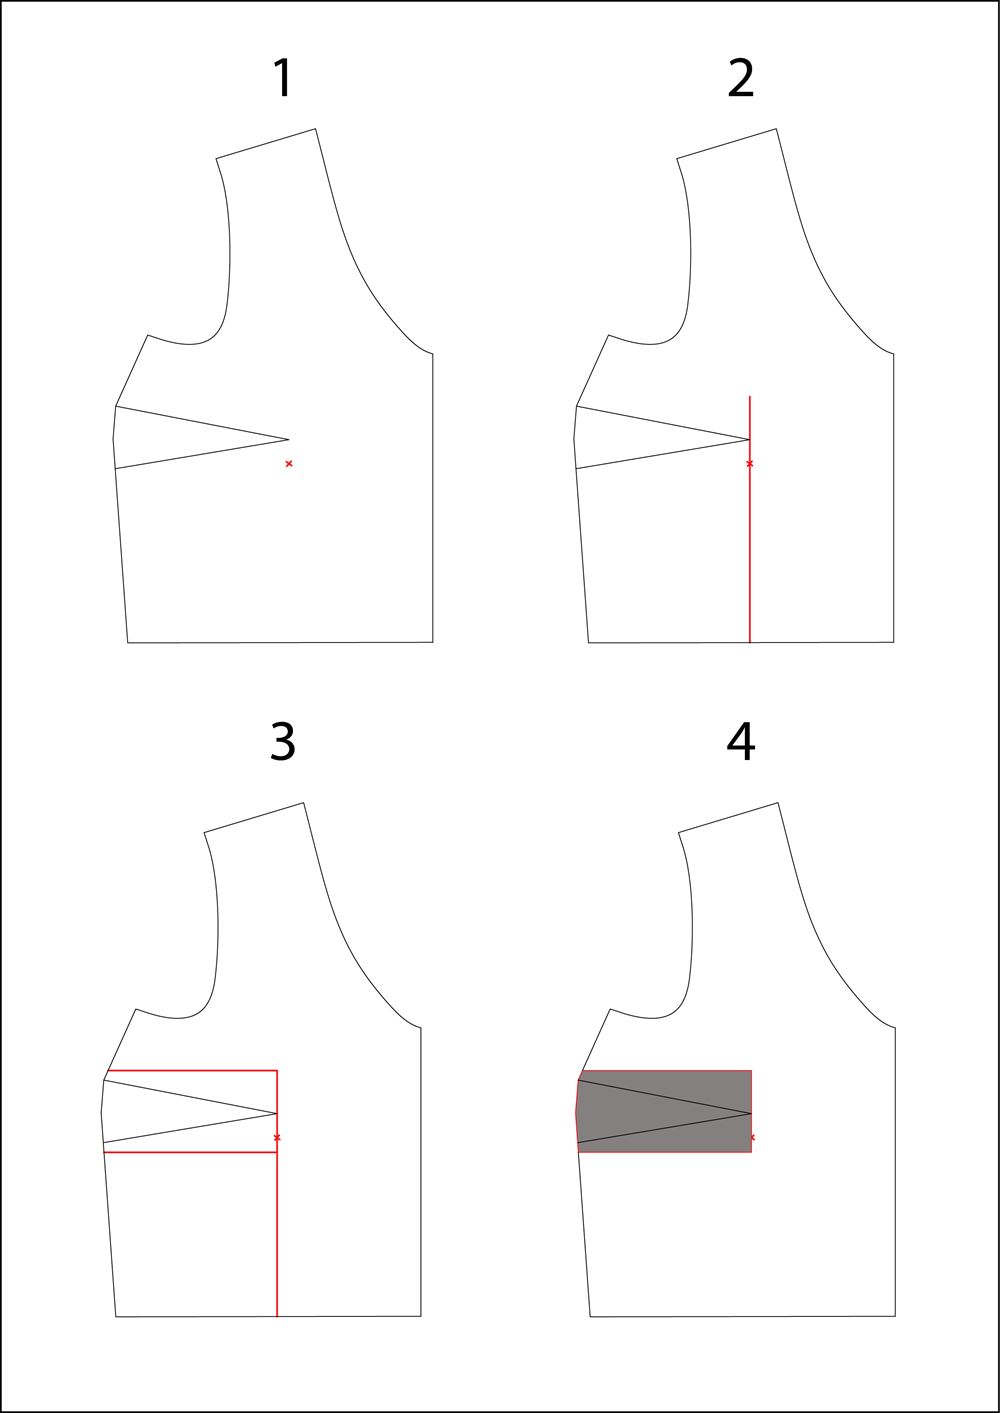
Bust darts are supposed to point towards the apex of your bust (your nipples, also called Bust point BP). If you’ve ever tried on a darted top and thought that the dart placement looked weird (often pointing above your bust apex), then you’ve encountered the issue of the dart placement being off for your particular figure. Lowering the bust point of a sewing pattern is a relatively easy alteration to perform. But first, if you haven't done a muslin already, you need to check if the bust darts will work for you as drafted. You can approximate the position by placing the pattern piece against your body (remember about seam allowances) and marking your BP with a pen. Measure the distance between your marking and the dart tip.
NOTE: the darts on your pattern probably end around 2 inches before your BP, that's ok, we just want to measure the vertical distance between your BP and the dart tip.
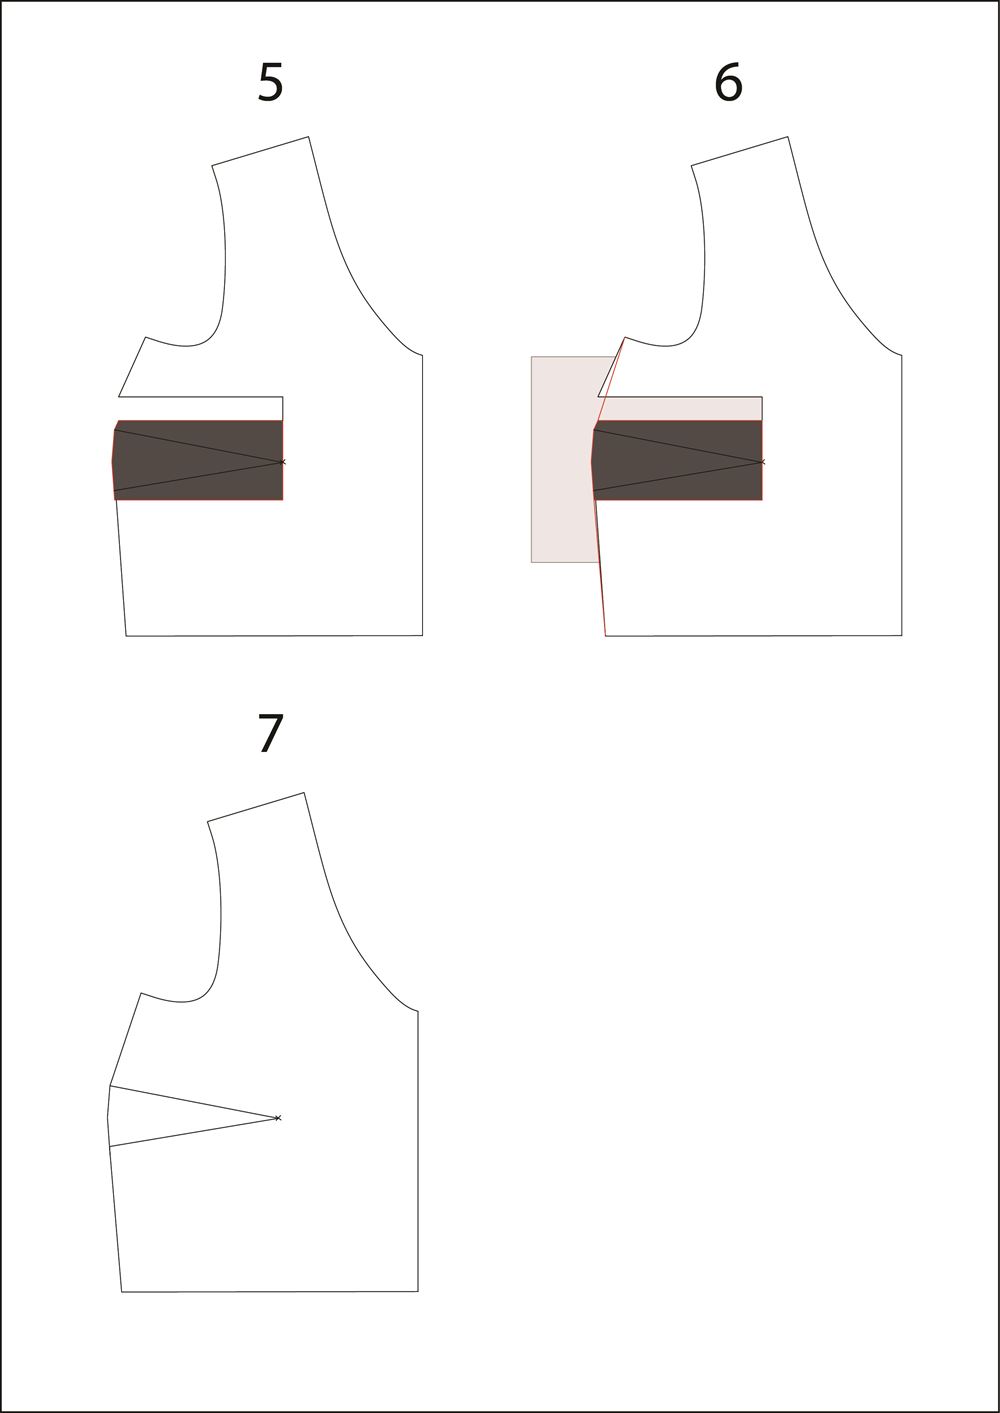
Step 1:
Measure the distance between the drafted bust point and your actual bust point. That distance is how much you’ll want to lower your bust dart. Mark your bust point on the pattern piece.
Step 2:
Draw a vertical line from the dart tip to the hem, parralele to the grainline.
Step 3:
Draw a box around the entire bust dart on your pattern piece.
Step 4:
Cut out the box that you just drew.
 Step 5:
Slide the box down the amount that you want to lower the bust dart by (following your marking).
Step 6:
Tape the box into place in its new position, and tape backing paper behind the gap that was left by sliding the box. True up your side seam as needed.
Step 7:
Label your new pattern piece, it’s a good idea to make a note of the alteration(s) done too!
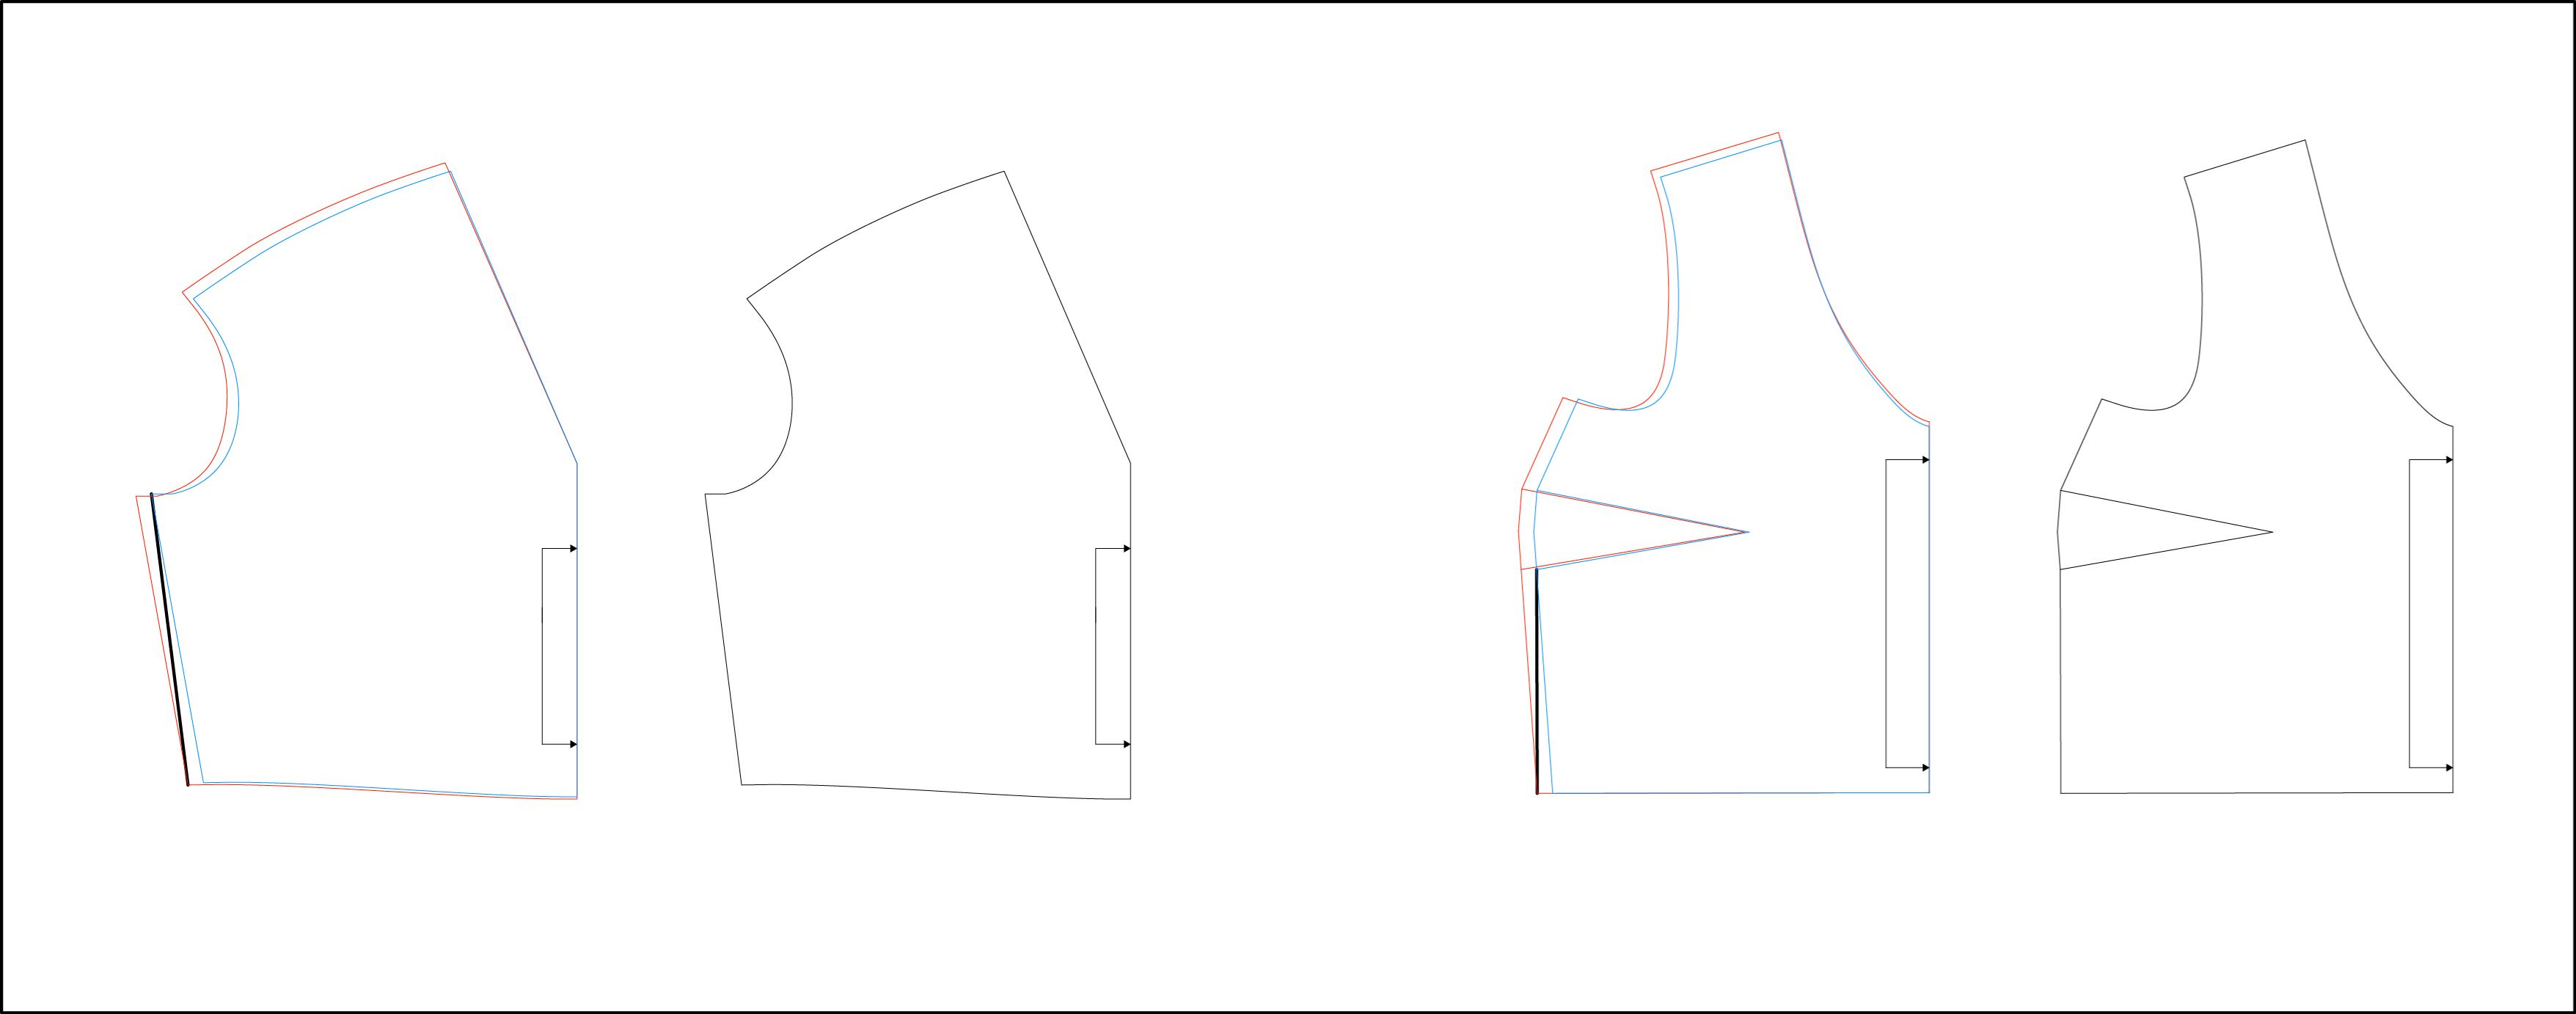
Full bust adjustement (FBA) on a dartless bodice

Ready to sew's patterns are drafted for a B cup so if you differ from that, you might need to do a bust adjustment. If you are a C cup you might be ok, but follow the steps below on measuring your high bust to work it out.
What is a bust adjustment?
A Full bust adjustment will create more space and ease at the front of the top only, which is done by increasing the size of the dart. It means instead of increasing the circumference of the top all the way around to accommodate the bust (which will make the armholes too big) it just adds more space at the front for the bust. We want to add more fabric so there is enough space for the fabric to go up and over the bust and also around the bust. A small bust adjustment will do the opposite. It decreases the amount of excess fabric over the bust by reducing the size of the dart.
What size should I pick?
Perhaps you have already made the garment and it fits you nicely over the shoulders, neckline, armholes but it is too tight over the bust and it looks like it is squashing your bust, you have draglines between the busts or you have coming from the bust into the side seams. With that situation, you are going to want to stitck to the pattern size you have already made but you are going to do an FBA to give you more space right over the bust area.
If you think you need to do a bust adjustment but you don't know what pattern size to pick first then you need take two measurements:
- The upper bust: This is the area of your chest right below your underarm.
- The full bust: This should be around your ribcage and over your bust point (nipple), parallel to the ground.
If the difference between your high bust measurement and full bust measurement is more than 5 cm (2 inches), then it will confirm that you need to do an adjustment.
- 2,5cm (1″) is a A cup
- 5cm (2″) is a B cup
- 7,5cm (3″) is a C cup
- 10cm (4'') is a D cup
Again, don’t worry if this is very different from your actual bra cup size!nChoose your pattern size based on your high bust measurement + 5cm (2'') because the pattern is already drafted for a B cup.
![]()
Ex: Hight bust measurement= 87cm - Full bust measurement= 95cm - Cup size= C.
- Hight bust measurement + 5cm (87cm + 5cm) = 92cm you will choose 40 in Ready to sew' size chart.
- Full bust measurement - 92cm (95cm - 92cm) = 3cm, this is the amount you have to adjust the pattern by.
As you are working on half of the front bodice you need to half 3cm, which gives 1,5cm. This is how much you will adjust the pattern piece by, we call that the bust differential.
You can approximate the position of your Bust point (BP) by placing the pattern piece against your body (remember about seam allowances) and marking your BP with a pen.
 Step 1:
Mesure the waistline on your front pattern and write it down somewhere.
Step 2:
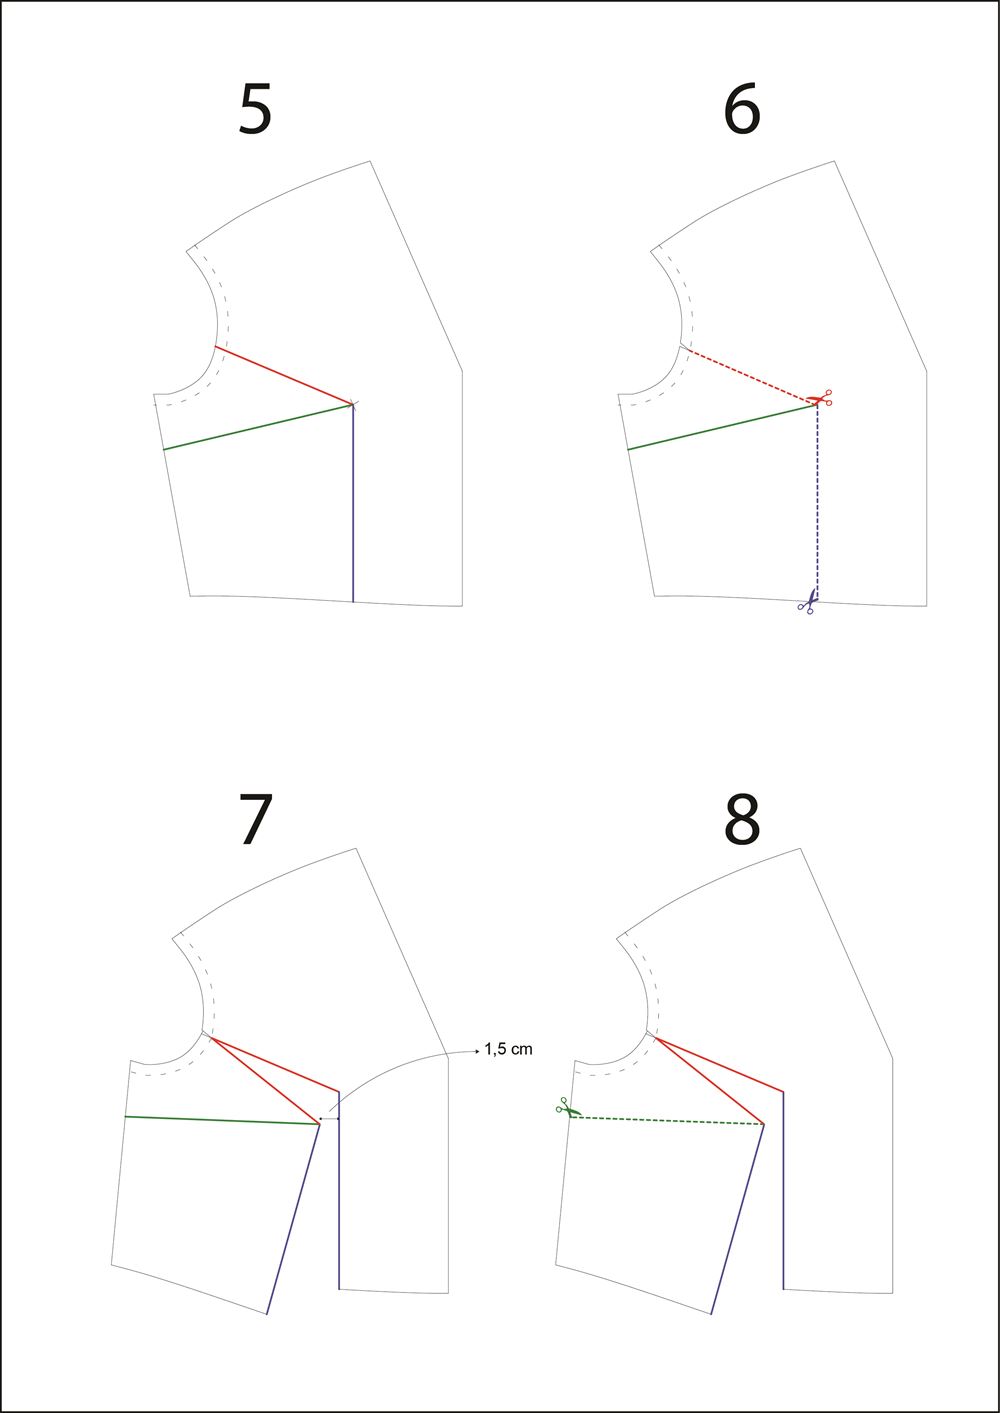
Starting from the BP mark, draft a line towards 1/3 of the armhole (red line).
Step 3:
Starting from the BP mark, draft a second line towards the hem and parralele to the grainline (blue line).
Step 4:
Starting from the apex mark, draft a third line towards the side seam (green line).
Step 5:
Draft the seam allowances on the armhole (1 cm).
Step 6:
Cut the blue line from the hem to the apex and the red line up to the armhole stitching line. Cut the armhole seam allowance but not completely through. leaving a little hinge to pivot.
Step 7:
Spread the piece out as in the diagram below. Rotate out along the hinge until you’ve widened the pattern the amount necessary (bust differencial) 1,5 cm in that exemple.
Step 8:
Cut along the third line (green line) from side seam to bust point, leave a little hinge on the end.
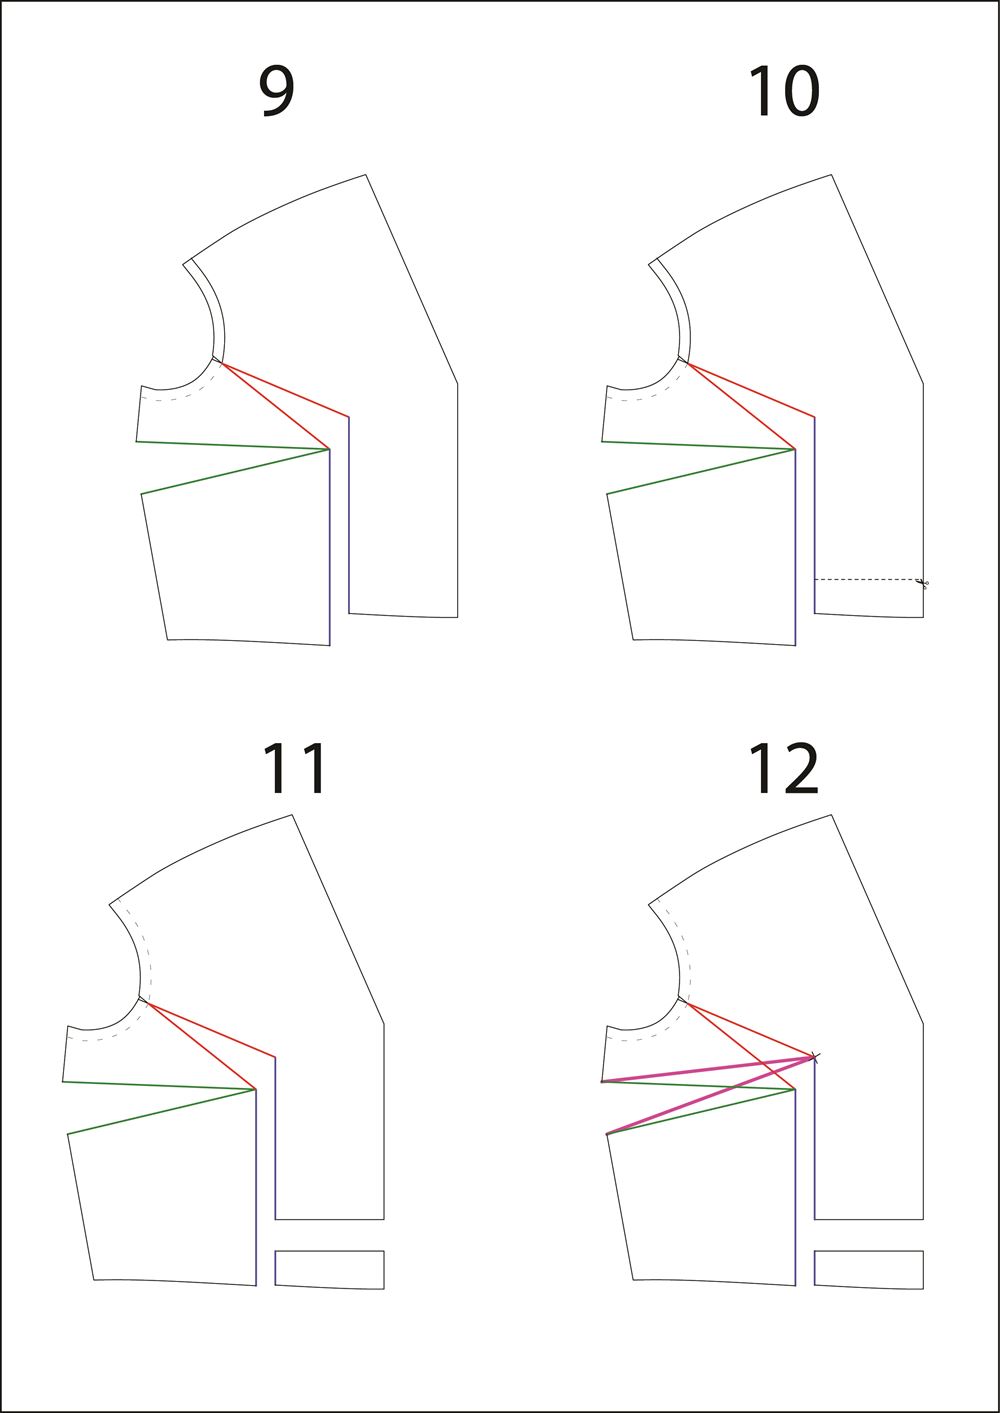 Step 9:
Rotate out along the bust hinge until the two blue lines are paralleles. You want to focus your attention on the width of the gap between the blue lines. This width should be the same than your bust differencial.
You will have created a dart on the left side. Carefully tape down your pattern to another sheet of paper.
Step 10 and 11:
The right part will now be shorter than the left. Cut along the "shorten-lengthen" line and slide this portion down until the bottom aligns on both sides. Tape down.
Step 12:
Now you have a dart-like shape, but it is not pointing at the right spot. It needs to be re-drawn to point to the BP (also called apex). Using a pen and ruler, re-draw the dart to point at the apex mark (pink line).
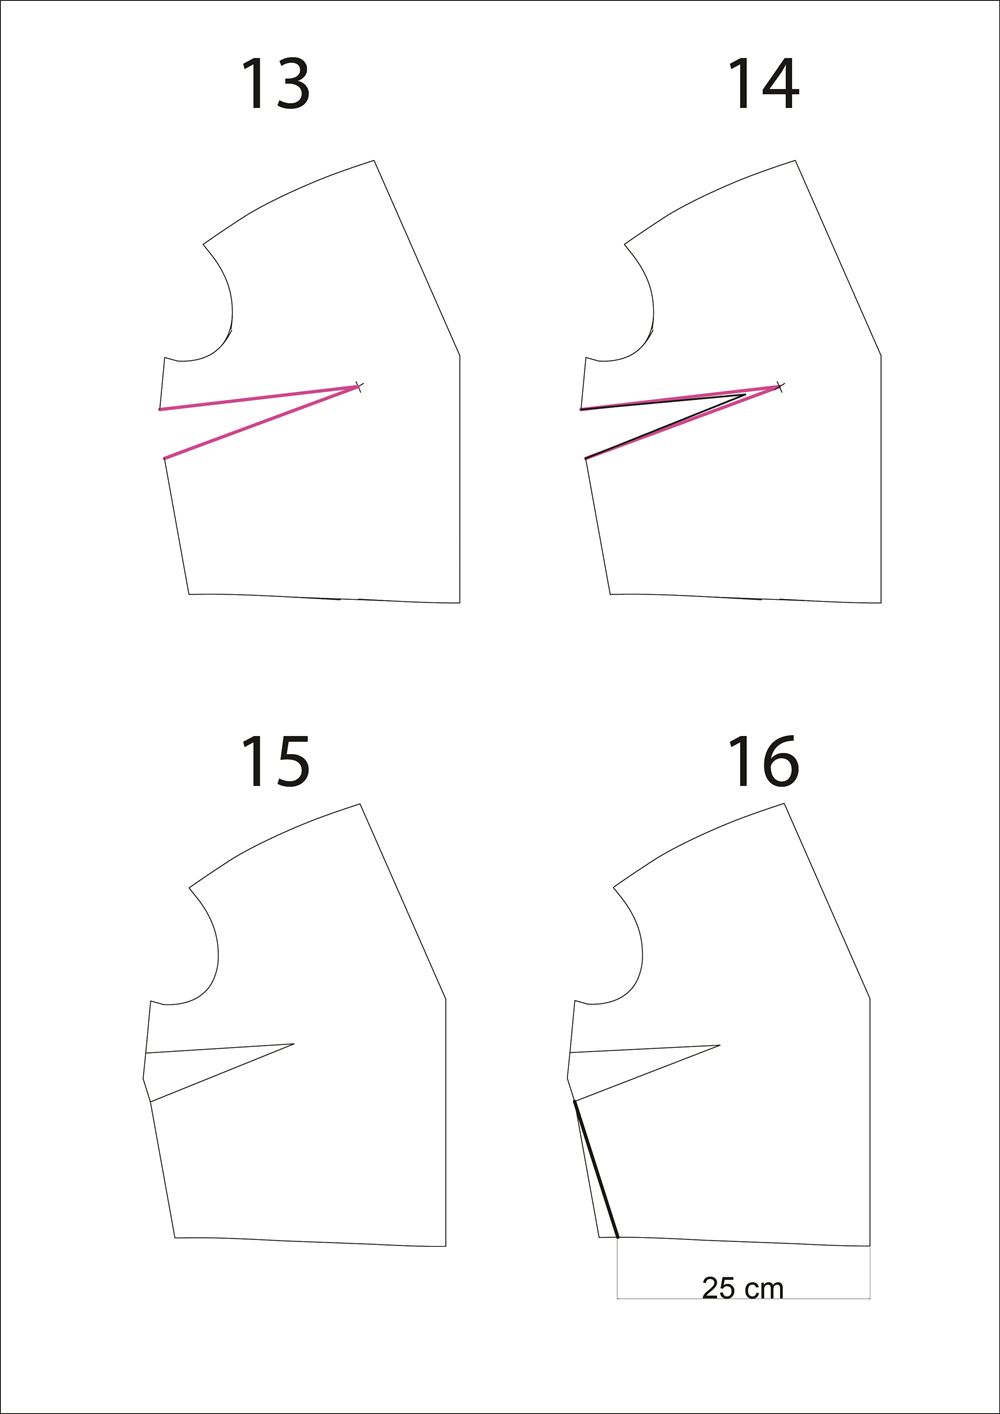
Step 13:
Transfer your pattern on anew piece of paper keeping only the essential line.
Step 14:
Back off the dart tip 2 cm or 3 cm from the apex.
Step 15:
Add a dart hat on the side seam.
Step 16:
With that method, we have added width to the waistline, if you want to get rid of that width, trace a line from the bottom of the dart to the original side waistline.
NOTE: You are probably wondering, "why do I have a dart, it was designed to be dartless?" Darts can help get a great fit through the bust if you are larger than a B cup. I recommend keeping the dart for the Jazz pattern if you are more than a B cup or at least more than a C cup. If making the Jazz jumpsuit/dress, you should adjust the front facing.
Full bust adjustement (FBA) on a bodice with darts
Click here for tutorial
![]()
Voilà! You now have your new pattern pieces ready for toiling to check the fit.
Vous pouvez réduire la largeur du bas de pantalon en travaillant sur la ligne intérieur de la jambe et en enlevant le nombre de centimètres désirés.
Bonne couture,
Raphaëlle
Je souhaiterais ajuster la largeur du bas du patron jazz afin de la diminuer. Malheureusement, je ne sais pas trop comment m’y prendre pour modifier sur le patron. Pourriez-vous m’éclaircir et m’aider à ce sujet ?
Merci beaucoup
Difficile à dire sans photos. Il est possible que la pointe d'épaule soit trop basse et que cela soit contraignant dans vos mouvements. Il semblerait que la taille de l'ouverture de l'emmanchure soit bonne mais que l'épaule soit trop longue pour vous. Si c'est le cas, je vous invite à faire un essai rapide. Pincez l'épaule pour faire remonter la couture de pointe d'épaule, essayez de bouger le bras vers l'avant, si les mouvements sont plus aisés, c'est que l'épaule légèrement tombante du vêtement ne vous convient pas. Effectuez ce petit ajustement sur votre patron et cela devrait régler votre problème. Très belle journée, Raphaëlle
d'après mes mesures j'ai coupé un buste taille 42 avec un ajustement pour un bonnet C. Le rendu au niveau de la poitrine est pas mal par contre je suis serrée au niveau de l'emmanchure devant (quand je ramène le bras vers l'avant je me sens "coincée" par le tissu). J'ai souvent ce problème avec les manches au niveau du biceps, qui pourtant n'est pas serré dans la manche. Auriez-vous une piste que je pourrais explorer pour régler ce problème? Est-ce que par exemple il vaudrait mieux que je parte sur un 44 qui correspond à mon TP avec un ajustement petites épaules? Merci d'avance!
Non, il n'est pas nécessaire de retracer l'emmanchure, elle devrait se placer correctement au porté. En revanche, il est important de faire une toile pour vérifier votre ajustement. Dans le cas d'un ajustement important (bonnet B à D par ex) le patron sera peut-être un peu déformé et il faudra réajuster un peu sur votre toile.
Belle journée,
Raphaëlle
merci de vos conseils...
Le tour de poitrine: prenez la mesure aux saillants, en passant par la pointe des seins, le bas des omoplates et en restant parallèle au sol.
Le tour de dessus de poitrine: prenez la mesure en passant sous les aisselles et sur le haut de la poitrine.
Prenez ces deux mesures puis suivez les étapes du blog pour trouver votre taille ;-)
Belle journée,
Raphaëlle